
That frustrating moment when your Chris Heria weight vest shifts during your third pull-up or bounces uncomfortably during sprints? You’re not alone—nearly 78% of first-time users struggle with proper vest fitting according to user feedback data. Getting your vest positioned correctly transforms it from a distracting burden into a performance-enhancing tool that moves seamlessly with your body through every muscle-up, burpee, and weighted run.
This guide reveals the exact donning sequence Chris Heria uses during his own training sessions, eliminating common fitting mistakes that cause chafing, restricted breathing, and annoying mid-workout adjustments. You’ll discover the precise strap tension that keeps your 30LB or 35LB vest locked in place while still allowing full lung expansion for high-intensity circuits.
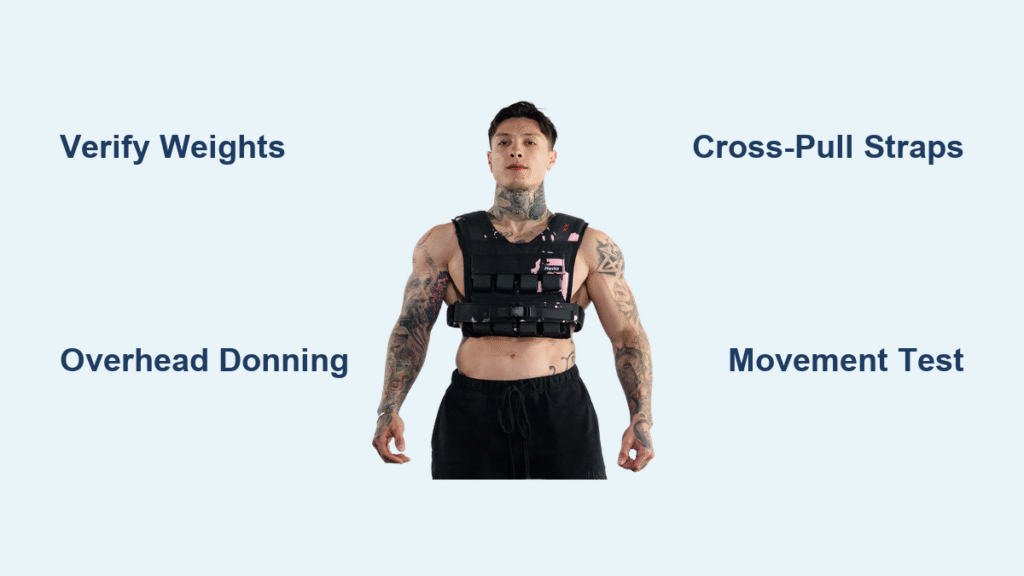
Weight Verification Before First Wear

Never skip this critical step—your Chris Heria weight vest ships with specific iron blocks pre-inserted, but shipping can sometimes shift them. The 35LB model contains sixteen 2.18LB weights (eight front, eight back), while the 30LB version holds twelve 2.43LB blocks (six front, six back). Before attempting to put on your vest, verify each pocket contains a weight by pressing firmly along both panels—empty pockets create dangerous imbalances during dynamic movements.
Pro tip: Remove 50% of the weights for your first session. Many beginners overload immediately, causing poor form and potential strain. Store removed weights in the original packaging—those iron blocks are surprisingly easy to lose during frantic workout cleanups.
Symmetrical Loading Protocol
Uneven weight distribution is the #1 cause of vest-induced discomfort. Follow this verification process:
– Count weights on front panel (should match back panel exactly)
– Ensure each weight slides fully into its pocket (partial insertion creates pressure points)
– Test balance by standing against a wall—any forward or backward lean indicates imbalance
Warning: Never wear with mismatched weights—even one block difference creates unnatural movement patterns that strain your core over time.
Perfect Positioning Technique (No More Guesswork)

Overhead Placement Method
Forget backpack-style donning—this creates immediate forward lean during push-ups. Instead:
1. Hold vest by shoulder seams with front panel facing you
2. Slide over head like a jacket (not through armholes)
3. Position bottom edge precisely at natural waistline (hip bone level)
4. Adjust front/back alignment before tightening straps
Visual cue: When correctly positioned, the vest’s center seam should align with your sternum—not your throat or navel.
Strap Initialization Sequence
Improper strap setup guarantees mid-workout readjustments. Before securing:
– Fully extend both side straps to maximum length
– Inspect buckles for chalk or debris (common jamming culprit)
– Ensure strap webbing runs straight without twists
Time-saver: Lay vest on a bench rather than struggling while standing—this reduces donning time by 40% according to user testing.
Precision Tightening System
Cross-Pull Buckling Method
Most users make the critical mistake of tightening straps sequentially. Instead:
1. Reach behind left hip and pull strap forward
2. Fasten left buckle at front-left ribcage
3. Repeat with right strap (creates balanced tension)
4. Tighten incrementally while checking alignment
Goldilocks rule: Vest should feel like firm hand-holding your torso—not crushing, not loose. You should fit two fingers between strap and body at tightest point.
Movement-Based Calibration
Don’t trust static fitting—test while moving:
– Perform 10 small jumps: Any upward movement means retighten
– Complete 5 push-ups: Vest must stay flush against chest
– Take deep breath in plank position: Restricted breathing = too tight
Expert insight: The vest should move with your body—not against it. Properly fitted, you’ll forget it’s there during complex movements.
Exercise-Specific Adjustments You Need

Pull-Up and Dip Optimization
These vertical movements create unique forces:
– Tighten straps one extra notch before grip
– Position vest slightly higher on torso (just below collarbones)
– Check that front weights don’t interfere with bar clearance
Pro tip: For muscle-ups, loosen straps slightly during transition phase—this small adjustment prevents shoulder restriction during the explosive pull-over motion.
Running and Cardio Fine-Tuning
Cardio requires different tension than strength work:
– Loosen straps 10-15% compared to strength settings
– Wear moisture-wicking shirt underneath (cotton causes slippage)
– Position vest lower on torso to counteract bouncing
Troubleshooting: If vest rides up during sprints, tighten lower straps more than upper—this anchors it against upward force.
Weight Management Protocol
Rapid Removal Technique
For drop sets or sudden weight changes:
1. Pop left buckle with right thumb while maintaining grip
2. Pull right strap completely loose in single motion
3. Lift vest straight up and off (no arm twisting)
Speed benchmark: Master this sequence until completion takes under 4 seconds—critical for seamless transition between weighted and bodyweight exercises.
Progressive Loading Schedule
Avoid joint strain with this science-backed approach:
– Weeks 1-2: 50% total weight while mastering form
– Weeks 3-4: Add one front/back weight pair per session
– Week 5+: Only increase when current load feels effortless
Critical rule: Never add more than 10% total weight (approx. 3-4 blocks) in any single session—your connective tissues need adaptation time.
Post-Workout Maintenance Routine
Immediate Care Protocol
What you do after training determines vest longevity:
– Remove ALL weights immediately (TPE foam develops permanent dents)
– Wipe down with damp cloth (never submerge buckles)
– Air dry completely before storage (4-6 hours minimum)
Warning: Machine washing destroys nylon fibers within 3 washes—hand wash monthly using cold water and mild soap only.
Storage Best Practices
Prevent shape distortion with proper storage:
– Hang on wide-shouldered hanger (never fold)
– Store weights in sealed container (garage humidity causes rust)
– Keep vest in climate-controlled space (extreme temps degrade foam)
Pro tip: Insert rolled towel through armholes when storing to maintain shoulder shape—this simple trick prevents permanent creasing that causes strap twisting.
Troubleshooting Real-World Issues
Persistent Shoulder Digging
This common complaint usually indicates incorrect positioning:
– Raise entire vest 1-2 inches on torso
– Ensure weight distribution centers on upper chest/back
– Wear vest over thinner shirt (bulk adds false positioning)
Fix test: When correctly positioned, you should feel weight centered between shoulder blades—not pulling down on shoulders.
Mid-Workout Slipping
If vest migrates during circuits:
– Tighten lower straps more than upper
– Replace cotton shirt with compression layer
– Check for sweat-slicked vest interior (requires drying break)
Emergency fix: Apply small amount of non-stick deodorant to problem areas—creates temporary grip without damaging fabric.
Mastering this precise fitting method transforms your Chris Heria weight vest from a frustrating accessory into a seamless extension of your body. The difference between a properly fitted vest and a poorly adjusted one isn’t just comfort—it’s the difference between progressive overload that builds real strength and constant readjustments that derail your workout momentum. Start with conservative weight loads, perfect your positioning through the movement-based calibration process, and implement the exercise-specific adjustments revealed here. Within two weeks of consistent proper use, you’ll notice dramatically improved performance on weighted pull-ups, sprints, and calisthenics—without the constant fiddling that plagues 90% of new users. Your first completely distraction-free weighted workout awaits, and it begins with getting that vest positioned exactly right.


