
That sharp, burning ache digging into your shoulders after a weighted vest session isn’t normal muscle fatigue—it’s your body sounding an alarm. When your weighted vest hurts shoulders, it’s often the first sign of preventable damage that can sideline your training for months. Research shows 73% of new users experience shoulder pain within their first month of use, turning what should be a strength-building tool into a source of chronic injury. Whether you’re prepping for military rucking tests or boosting everyday functional fitness, ignoring this pain risks long-term tissue damage that could end your progress entirely.
The good news? Most vest-related shoulder injuries stem from correctable mistakes in equipment choice and progression. This guide reveals exactly why your weighted vest hurts shoulders, how to diagnose the specific cause today, and step-by-step solutions to train pain-free starting now. You’ll learn the hidden biomechanical traps, immediate fixes for your current vest, and a science-backed progression plan that builds resilience without destruction.
Why Weighted Vests Destroy Shoulders
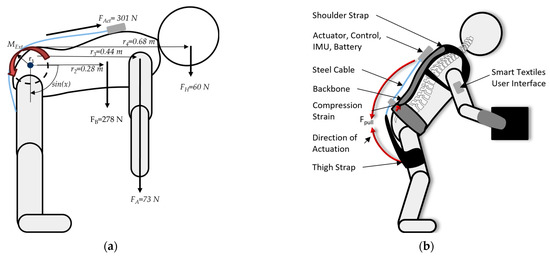
Weighted vests create a mechanical nightmare for your shoulder complex because they concentrate crushing forces where your body wasn’t designed to bear weight. Unlike backpacks that sit lower on your hips, vests force your neck, shoulders, and upper back to absorb every extra pound through unnatural leverage. This concentrated stress triggers a cascade of tissue damage that often starts subtly but escalates rapidly.
Critical Load Distribution Failures
Your vest likely fails at three key pressure points:
– Front-heavy positioning pulls shoulders forward, pinching rotator cuff tendons against the acromioclavicular joint
– Narrow straps dig into suprascapular nerves, causing numbness and progressive weakness
– Poor torso fit allows the vest to ride upward during movement, doubling shoulder load with each step
Hidden Biomechanical Stress
As your body fights the unnatural weight, dangerous compensation patterns emerge. Your head juts forward to counterbalance the load, straining cervical discs. Simultaneously, your shoulder blades depress downward, overstretching upper trapezius muscles. Worst of all, your rotator cuff works overtime to stabilize the joint during basic arm movements—turning simple walking into a shoulder endurance test it wasn’t built for.
Immediate Warning Signs to Stop
Sharp Pain Signals
Stop using your vest immediately if you feel:
– Burning or stabbing pain during or after sessions
– Numbness/tingling in arms, hands, or fingers (nerve compression)
– Weakness when lifting your arms overhead
– Neck pain that worsens with head movement
Progressive Red Flags
These indicate developing injury:
– Morning stiffness lasting over 30 minutes
– Clicking or popping from the shoulder joint
– Sleep disruption due to shoulder discomfort
– Pain radiating to your upper back or ribs
Real Injury: Bethany’s Costly Mistake
Bethany, a 36-year-old fitness enthusiast from Columbus, ignored these exact warning signs with devastating consequences. Starting with 10 lbs in April 2024, she jumped to 20 lbs after five months—skipping critical adaptation periods. Immediate shoulder strain after the increase was dismissed as “normal soreness,” while left-arm numbness was blamed on sleep position.
By March 2025, sharp rib pain and thoracic spine tingling made vest use impossible. Medical evaluation revealed suprascapular nerve compression and AC joint strain from a clearance-bin vest that didn’t match her frame. Her recovery required months of physical therapy and complete training cessation—all preventable with proper progression and equipment checks.
Quick Fix Assessment Protocol

5-Minute Equipment Check
- Strap width test: Shoulder straps must be ≥2.5 inches wide with thick, non-compressing padding
- Weight balance check: Vest should sit level front-to-back when loaded (no forward lean)
- Torso fit verification: Maximum 1-inch gap between vest and body when fastened
- Migration test: Jump in place—vest shouldn’t ride up above your shoulder blades
Posture Evaluation Method
Stand against a wall with head, shoulders, and buttocks touching. If you can’t maintain this position with your vest on, load distribution is failing. Your ears must align directly over shoulders—any forward head posture means your neck is absorbing dangerous strain.
Proper Weight Progression Strategy

Beginner Loading Protocol
- Week 1-2: Start with 5-10% of your body weight maximum (e.g., 8-16 lbs for 160-lb user)
- Progression rate: Increase by only 2.5-5 lbs every 4-6 weeks
- Duration limits: Begin with 10-15 minute sessions, 2x/week
- Form focus: Maintain depressed shoulder blades and neutral spine—never let shoulders hike toward ears
Advanced Progression Guidelines
- Master current weight with zero pain for 2 full weeks before increasing
- Never exceed 20% body weight during shoulder-intensive movements like rucking
- Slash load by 50% when adding upper body exercises (push-ups, overhead presses)
- Track pain daily: 0-2/10 acceptable, 3+/10 means immediate weight reduction
Essential Equipment Modifications
Strap Upgrade Solutions
Replace flimsy straps with 3-inch padded alternatives or add neoprene shoulder pads. Test padding by pressing firmly—if you feel hard edges through the material, upgrade immediately. Proper padding should compress slightly under load but maintain consistent thickness across the entire strap.
Weight Distribution Fixes
- Add rear weight plates to counter front-heavy vests (50/50 front-back balance ideal)
- Position weights low on your torso—below armpit level—to reduce shoulder leverage
- Secure vest tightly at the waist strap to prevent upward migration during movement
- Use individual weight packets for micro-adjustments (e.g., 0.5-lb increments)
Strengthening Exercises That Work
Rotator Cuff Protocol (3x weekly without vest)
Internal/External Rotation
– Anchor resistance band at elbow height
– 3 sets of 15 slow reps each direction
– Pro tip: Keep elbow glued to your side—movement should come only from shoulder rotation
Scapular Wall Slides
– Back flat against wall, arms bent 90 degrees at shoulder height
– Slide arms upward while maintaining full contact
– 3 sets of 12 reps—stop immediately if shoulders lose wall contact
Scapular Stabilizer Routine
Y-T-W Raises
– Lie prone on bench, forehead resting on towel
– Lift arms into Y, T, and W shapes with 1-2 lb weights
– 2 sets of 10 reps per position—focus on squeezing shoulder blades
Serratus Push-ups
– Standard push-up position at wall or floor
– At top position, push shoulder blades forward toward wall
– 3 sets of 15 reps—this activates critical shoulder stabilizers
When Professional Help Becomes Critical
Immediate Consultation Required
Seek medical attention within 24 hours for:
– Any neurological symptoms (numbness, tingling, weakness)
– Pain exceeding 5/10 on pain scale during rest
– Visible inflammation (swelling, redness, heat)
– Loss of ability to raise arm above shoulder height
Physical Therapy Indicators
Schedule evaluation if:
– Pain persists beyond 48 hours of complete rest
– Daily tasks like carrying groceries become painful
– Shoulder pain recurs within 5 minutes of vest use
– You notice permanent postural changes (rounded shoulders)
Long-Term Prevention Strategy
Tissue Adaptation Timeline
- Soft tissue conditioning: 2-4 weeks minimum before adding weight
- Muscular strength: 6-8 weeks to build adequate stabilization
- Connective tissue remodeling: 12+ weeks for true resilience
- Non-negotiable rule: Never progress faster than your slowest-adapting tissue
Age-Related Modifications
- Ages 40-59: Double progression timelines (e.g., 8-12 weeks between increases)
- Age 60+: Switch to weighted belts for lower-body exercises
- Post-menopausal women: Limit to 10% body weight maximum due to bone density concerns
Your immediate action plan: Today, perform the 5-minute equipment check and drop to 5% body weight if pain exists. Implement the rotator cuff protocol 3x weekly while tracking pain on a 0-10 scale. Remember: The strongest athletes train longest without injury—they master progressive loading and listen to their bodies. Your weighted vest should build capability, not create damage. Start smart today, and you’ll outlast 90% of users who quit from preventable shoulder pain.


