
Tired of hitting chest growth plateaus with standard push-ups? Your muscles adapt quickly to bodyweight-only training, leaving you stuck in a strength limbo. The solution lies in one versatile tool: the weighted vest. By adding strategic resistance to bodyweight movements, you trigger new muscle growth in your pectorals without bulky gym equipment. This approach delivers real hypertrophy where traditional methods fail—especially for home trainers and calisthenics enthusiasts.
Weighted vest exercises for chest development work because they solve the progression problem. Unlike adjustable dumbbells that require space and investment, a vest lets you incrementally increase load on foundational movements like push-ups. Research shows progressive overload is non-negotiable for muscle growth, and vests provide the perfect path to achieve it. In this guide, you’ll discover exactly how to select loads, master form, and program vest-based chest routines that build noticeable mass.
Start with 5-10% Bodyweight: Your First Weighted Vest Load
Never slap on heavy plates immediately—your joints need adaptation time. Begin with just 5-10% of your bodyweight (7-15 pounds for most adults). This prevents form breakdown while building tendon resilience for heavier loads. Jumping straight to 20+ pounds risks shoulder strain and compromises your weighted vest exercises for chest effectiveness.
Progressive Overload Rules That Actually Work
- Prerequisite: Master 15+ perfect bodyweight push-ups before adding weight
- Load increases: Add only 1-2 kg after hitting 3 sets of 12 flawless reps
- Advanced limit: Top out at 30% bodyweight (max 40 pounds for push-ups)
Vest Selection Guide by Experience Level
- Beginners: Fixed 10-20 lb vest (Synergee style) for simple progression
- Intermediate: Adjustable 1-15 kg vest (Pullup & Dip style) for micro-loading
- Advanced: Plate-loaded system up to 45 lb (Strata style) for precise increments
Critical fit check: Cinch straps tightly enough to prevent bouncing during push-ups, but ensure full diaphragmatic breathing. The vest must sit high on your chest—never riding low on your waist.
Fix These Weighted Push-Up Form Mistakes Immediately
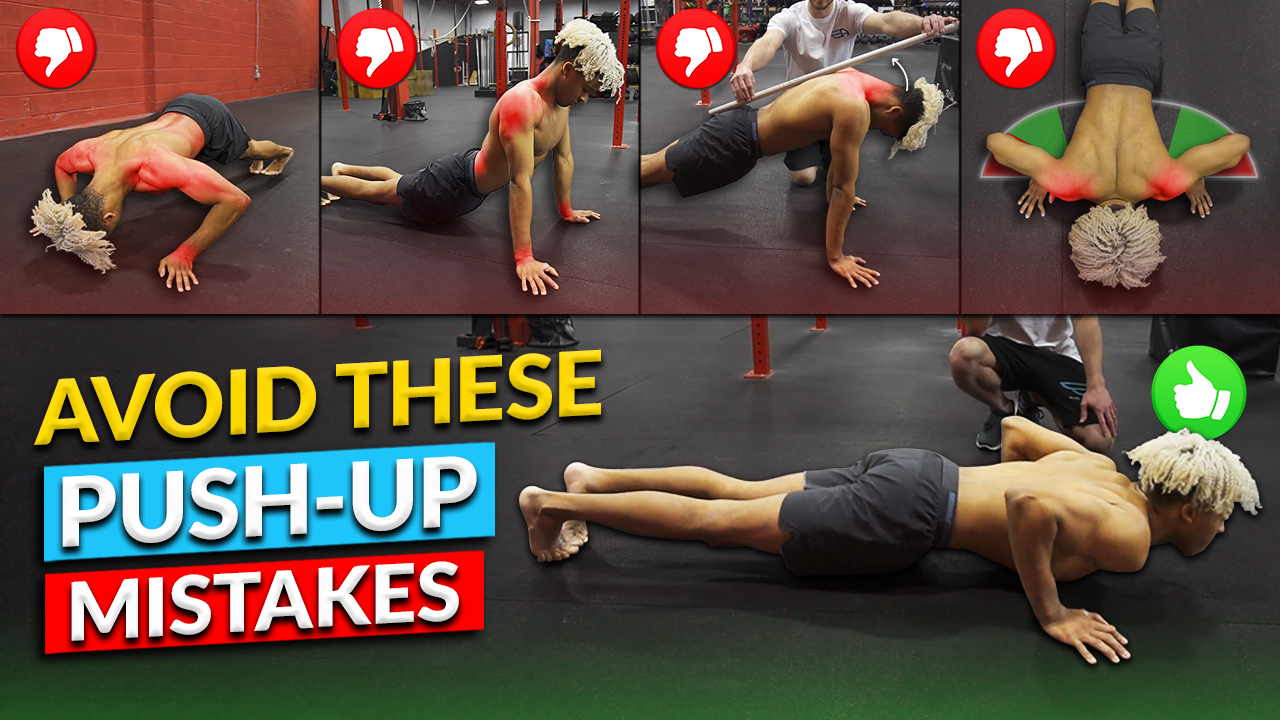
Adding weight magnifies every technical flaw. Most lifters unknowingly sabotage their weighted vest chest workouts with these errors. Correct them to maximize pec activation and prevent injury.
Common Form Breakdowns & Fixes
Lumbar hyperextension (arched back):
Reduce vest load by 25% and elevate hands on a bench. This shifts emphasis to your chest while reducing spinal stress.
Elbow flare beyond 60 degrees:
Cue “screw hands into the floor” during descent. This engages lats and rotates shoulders into a safer position, directly targeting the sternal head of your pecs.
Incomplete range of motion:
Lower until your chest touches the floor (or elbows reach 90 degrees). The weighted vest increases eccentric tension—use that 3-second descent to build muscle.
Pro tip: Film your first vest workout. Weighted resistance exposes weaknesses invisible during bodyweight push-ups, especially in core stability.
Target Every Chest Fiber: 5 Best Weighted Vest Variations
Generic push-ups hit only a portion of your pectorals. These weighted vest exercises for chest development isolate specific regions for complete development.
Diamond Push-Ups: Blast Your Inner Chest
Place thumbs and index fingers together under your sternum to form a diamond. The narrow grip shifts emphasis to inner pec fibers and triceps. Wear 5-20 pounds and aim for 6-12 reps per set. Stop immediately if you feel wrist strain—use push-up handles for joint relief.
Wide-Grip Push-Ups: Expand Your Outer Chest
Position hands 1.5-2 times shoulder-width apart. This stretches the pectoralis minor and serratus anterior for that coveted “chest sweep.” Use 5-25 pounds for 8-12 reps. You’ll feel intense outer-chest activation during the lockout phase.
TRX Atomic Push-Ups: Build Upper Chest + Core Strength
Anchor TRX straps at mid-calf height. Perform a standard push-up, then pull knees toward chest at the top position. The weighted vest (10-40 lb) amplifies upper-pec and core engagement. Master unweighted first—this advanced move requires serious stability.
Ring Suspended Push-Ups: Activate Full Chest Stability
Grip gymnastic rings set low to the ground. The instability forces your entire chest to work harder for stabilization. Start bodyweight-only, then add 10-30 pounds using a 3-1-1 tempo (3s down, 1s pause, 1s up). Expect immediate serratus anterior burn.
Program These Chest-Building Weighted Vest Workouts

Stop guessing—implement these science-backed routines designed specifically for weighted vest exercises for chest growth.
Strength-Focused Chest Session (30 Minutes)
- Weighted Push-Ups: 4 sets × 6-8 reps @ 15-25 lb (90-120s rest)
- Weighted Dips: 3 sets × 8-10 reps @ 15-25 lb (90s rest)
- TRX Atomic Push-Ups: 3 sets × 8-10 reps @ 10-20 lb (90s rest)
- Wide-Grip Finisher: 2 sets × max reps @ 10 lb (60s rest)
Why it works: Heavy loads on compound movements trigger maximal motor unit recruitment in the pectorals.
Hypertrophy Circuit (20 Minutes)
Complete 3-4 rounds (60s between exercises, 2min between rounds):
1. Weighted Push-Ups – 12 reps
2. Diamond Push-Ups – 10 reps
3. Ring Push-Ups – 8 reps
4. Plank Up-Downs – 10 reps/arm
Key benefit: Metabolic stress from minimal rest builds sarcoplasmic hypertrophy for fuller-looking pecs.
Advanced Progression: Break Through Plateaus

When standard progression stalls, implement these pro strategies for continued weighted vest chest development.
Weekly Micro-Cycle Example
- Monday: Max strength (Weighted Push-Ups 5×5 @ 25 lb)
- Wednesday: Hypertrophy (TRX Atomic + Ring Push-Up superset)
- Friday: Conditioning (EMOM 20: 6 Pull-ups + 12 Push-ups vest on)
- Saturday: Active recovery (light vest walk + doorway pec stretches)
Deload Protocol You Can’t Skip
Every 6-8 weeks, cut vest load by 50% and reduce volume by 30%. This prevents overuse injuries while maintaining neural pathways. Warning signs you need this:
– Shoulder pain during push-up descent
– Declining rep quality across consecutive sessions
– Persistent tightness in upper back muscles
Prevent Injury: Critical Safety Protocol
Weighted vest exercises for chest can wreck your shoulders if you skip these steps.
Pre-Workout Checklist
- Perform 15-20 pain-free bodyweight push-ups first
- Verify vest weight distribution—no front/back imbalance
- Confirm no active wrist, shoulder, or lower back issues
Post-Workout Recovery Sequence
Hold each stretch 2×30 seconds:
– Doorway pec stretch: Elbow bent 90°, lean forward gently
– Lat hang: Dead hang from pull-up bar to decompress spine
– Wrist flexor stretch: Palm down, gently pull fingers back
Muscle balance rule: For every chest push, do two pulling movements (e.g., weighted vest rows). This prevents the rounded-shoulder posture common in vest users.
Real Results: 6-Week Transformation Guide
Jonathan Cox added 20-pound vest push-ups 3x weekly. After six weeks, he gained visible chest thickness and increased his max push-up count by 15%. Martha Laura Mendoza incorporated 14-pound vest circuits for fat loss—she dropped 6 pounds while boosting her push-up max from 8 to 25 reps in eight weeks. Both achieved this without gym access, proving weighted vest exercises for chest deliver real-world results.
Your chest won’t explode overnight, but consistent vest training builds impressive mass anywhere. Start with 3×10 bodyweight push-ups. Once you hit 20 clean reps, grab a 10-pound vest and run the strength-focused protocol. Track weekly progress—when you nail all reps with perfect form, add 2 pounds. In 12 weeks, you’ll own a chest that turns heads, built entirely through strategic weighted vest exercises for chest development. No barbells required.


