
Your favorite 5-mile trail feels surprisingly challenging after strapping on a weight vest—suddenly, those gentle inclines demand real effort while your legs burn like never before. This simple addition converts casual hikes into powerhouse training sessions that build hiking-specific strength without pounding your joints like running. Whether you’re prepping for Spain’s Camino de Santiago or aiming to conquer ultra-marathons, adding strategic load to your torso delivers disproportionate fitness gains. You’ll discover exactly how to start safely, avoid common injuries, and leverage this tool to make every trail your personal gym.
Why Weighted Hiking Beats Running for Joint Health
8-12% Higher Calorie Burn Without Joint Impact
Strapping on a 10-pound vest immediately boosts calorie expenditure by 8-12% compared to unweighted hiking at identical speed and terrain. Unlike running—which subjects knees to 3-5x bodyweight impact forces—weighted hiking maintains walking’s natural low-impact rhythm while dramatically increasing muscular demand. Your heart works harder (elevating heart rate 8-15 BPM), but your joints stay protected, making this ideal for injury-prone hikers or those recovering from setbacks.
Full-Body Muscle Recruitment You Can’t Get on Flat Ground
Weight vests force continuous engagement through your entire kinetic chain. On uphill sections, your quadriceps fire 30% harder with every step, while downhill descents transform your glutes and hamstrings into shock absorbers controlling the added mass. Crucially, the vest’s front-and-back weight distribution activates deep core stabilizers like your transverse abdominis—muscles ignored during regular hiking. This full-body tension pattern builds functional strength that directly transfers to carrying heavy backpacks, preventing the forward lean that causes debilitating lower back pain on long treks.
Choosing Your First Weight Vest: Avoid These Costly Mistakes
5-Pound Starting Point for Every Hiker
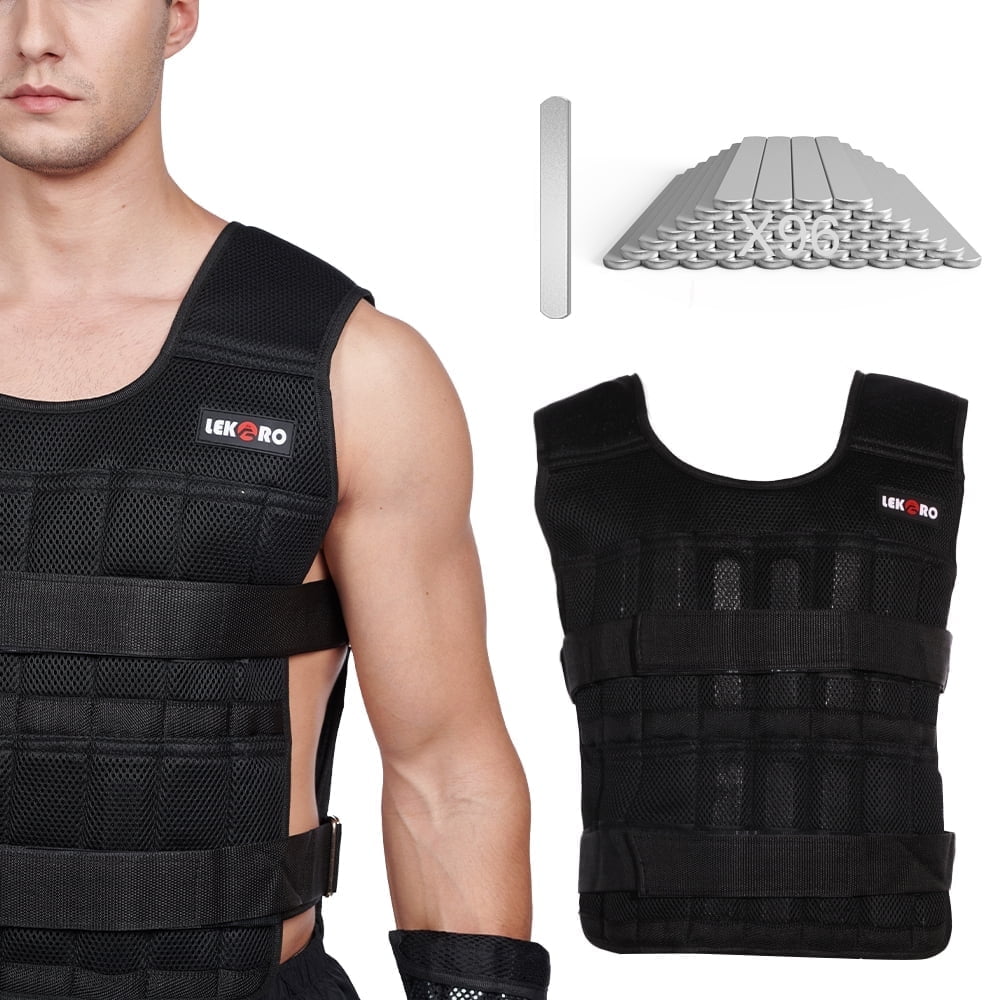
Beginners consistently fail by choosing vests with excessive capacity. Prioritize adjustable systems using 1-2 pound removable plates over fixed-weight models. A 150-pound hiker should start with just 8-10 pounds—not the vest’s maximum load—to allow gradual progression. Look for side-bungee tensioners that eliminate bouncing during steep climbs and breathable mesh panels that prevent sweat buildup. Wide shoulder straps distributing pressure evenly across your torso prevent the “collar bone bruising” common in cheap vests.
Budget vs. Premium Vest Breakdown
$30-40 Budget Vests (ZELUS/Aduro Sport): Suitable for flat terrain walks under 45 minutes. These often lack proper weight distribution for hills, causing excessive shoulder strain.
$80-110 Mid-Range (CAP Barbell/Hyperwear): Feature moisture-wicking fabrics and precise plate systems handling 20-40 pounds comfortably. Ideal for serious trail training.
$200+ Premium (Omorpho G-Vest): Justified only for technical terrain or sessions exceeding 2 hours. Micro-load plates (as small as 0.5 pounds) and anti-slip liners prevent shifting on rocky scrambles.
Pro Tip: Test vests loaded with water bottles before buying—many feel fine empty but bounce painfully when weighted.
Injury-Proof Your Weighted Hikes: Critical Form Fixes

Why Lower Back Pain Strikes (And How to Stop It)
Forward trunk lean—the #1 cause of vest-related back strain—occurs when core muscles fatigue under load. This shifts pressure to spinal discs instead of distributing weight through strong glutes. Prevent it with these real-time posture cues:
– Chest lifted: Imagine a string pulling your sternum toward the sky
– Core braced: Engage abs as if preparing for a gentle punch
– Shoulders back: Retract shoulder blades without tensing traps
– Stride shortened: Take 10-15% smaller steps to reduce impact
Terrain Progression Sequence That Prevents Knee Damage
Rushing to steep trails causes patellofemoral pain as added weight multiplies compressive forces on kneecaps. Master this sequence:
1. Flat pavement: Build baseline strength (2-3 weeks)
2. Park trails: Introduce mild elevation changes (1-2 weeks)
3. Steeper hills: Only after completing 4+ weeks pain-free
4. Rocky scrambles: Final stage for advanced balance training
Warning: Joint pain during activity—not just muscle soreness—requires immediate deloading. Morning heel pain signals developing plantar fasciitis; stop weighted hikes until resolved.
Smart Loading Progressions for Real Results

Bodyweight Percentage Rules You Must Follow
Exceeding 10% of your bodyweight dramatically increases injury risk while providing minimal extra benefit. Use these exact starting points:
– 100-120 lb hikers: Begin with 5-6 pounds
– 130-160 lb hikers: Start with 8-10 pounds
– 170-200+ lb hikers: Start with 10-15 pounds
The 8-Week Progression Elite Trail Runners Use
Weeks 1-2: Establish baseline with 30-45 minute flat walks at starting weight
Weeks 3-4: Add 2-3 pounds ONLY if no joint pain occurs
Weeks 5-6: Increase duration by 15-20 minutes per session
Weeks 7-8: Add final 2-5 pounds OR transition to steeper terrain
Critical Insight: Muscle soreness lasting beyond 48 hours means you progressed too fast. Scale back weight before continuing.
Camino-Specific Training Protocol
Why Vest Training Alone Fails Pilgrims
Weight vests build general strength but don’t replicate hip-belt pressure or shoulder strap loading—leading to unexpected sore spots on actual treks. Experienced Camino hikers use this phased approach:
– Weeks 1-4: Build base with 10-12 pound vest (3x weekly)
– Weeks 5-6: Transition to actual backpack loaded 2 pounds above target weight
– Weeks 7-8: Long hikes exclusively with real pack at final weight
User Success: “Started at 5 lb, added 5 lb every 2 weeks,” reports Apollo9000. “Doubled my eventual Camino pack weight. Transitioned to real pack 2 months out—no injuries, faster uphill times.”
Urban Hiker’s Treadmill Hack
Flat-landers can simulate mountain training using this proven method:
– Treadmill at 10-15% grade wearing 15-20 pound vest
– 60-minute steady-state hikes build climbing endurance
– Interval sessions: 4x 5-minute fast hikes at steeper grade with 3-minute recovery walks
Pro Tip: Rotate between treadmill days and outdoor weighted hikes to prevent adaptation plateaus. Add a weighted vest during stair climbing for explosive power gains.
Maintenance Must-Dos to Extend Vest Life
Prevent Rust and Fabric Damage
Remove all weight plates after each use—leaving them in stretches fabric and accelerates wear. Store vests in dry conditions; monthly inspect steel plates for rust spots (coat with light oil if found). Never machine-wash; spot-clean with damp cloth to preserve stitching integrity. For DIY sandbag systems, replace contractor bags every 3 months as sand moisture degrades material.
When to Ditch the Vest for Your Actual Backpack
Weighted hiking excels for building foundational strength but lacks specificity for major treks. Begin transitioning to your real backpack 4-6 weeks before departure:
1. Start with 80% of target pack weight
2. Add 1-2 pounds weekly until reaching final load
3. Prioritize terrain matching your actual route (e.g., rocky paths vs. paved trails)
Key Insight: Elite ultra-runners use vests only during base-building phases, switching to sport-specific training as events approach. Your body adapts to the exact load distribution it experiences.
Hiking with a weight vest transforms mundane walks into potent full-body conditioning sessions—but only when approached strategically. Start conservatively with 5-10% of your bodyweight, master flat terrain before tackling hills, and always prioritize posture over load. Remember that vests build general strength while actual backpacks provide trek-specific conditioning; time your transition wisely. Within 8 weeks of disciplined training, you’ll notice steeper climbs feel effortless, descents no longer wreck your knees, and daily activities require noticeably less effort. Most importantly, you’ll step onto trails with the confidence that your body is truly prepared for whatever adventure awaits.


