
Tired of paying $30-80 for store-bought ankle weights that slip, chafe, or simply don’t fit right? Learning how to make an ankle weight at home transforms basic craft supplies into professional-grade fitness equipment tailored exactly to your needs. Whether you’re rehabbing an injury or intensifying your leg day routine, this DIY approach puts you in control of weight distribution, comfort, and fit—saving you money while eliminating the discomfort of mass-produced versions.
Most commercial ankle weights force you into standard sizes that don’t match your unique anatomy, causing painful pressure points and uneven resistance. By making your own, you’ll create weights that stay securely in place during lunges and leg lifts, with customizable resistance from 1 to 10 pounds per ankle. This guide delivers step-by-step instructions using materials you can find at any fabric store, turning basic sewing skills into powerful fitness tools that outperform expensive retail options.
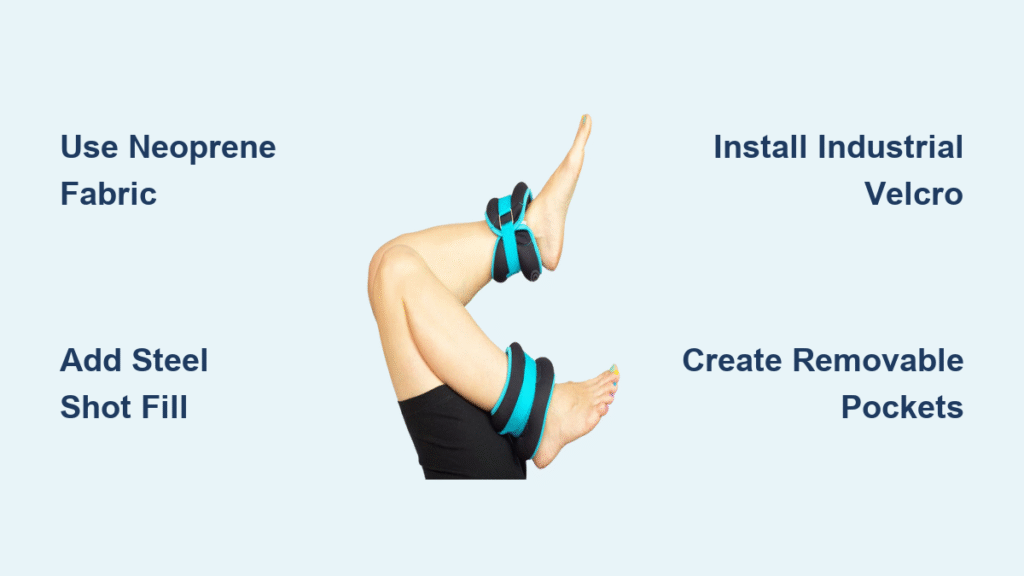
Essential Materials for DIY Ankle Weights
Best Fabrics for Comfort and Durability
Your fabric choice directly impacts workout performance and comfort. Neoprene stands out for high-intensity sessions with its water-resistant properties that prevent sweat absorption while cushioning ankle bones from pressure points. Cotton canvas offers superior breathability for lighter weights used during walking or physical therapy, and it withstands repeated washing better than synthetic alternatives.
For professional results, combine nylon webbing for the outer shell with fleece lining against your skin. This pairing eliminates the scratchy irritation that makes most people abandon ankle weights after just ten minutes of use. You’ll need approximately 1/4 to 1/2 yard of main fabric per ankle weight, depending on your size—the perfect amount to test different materials before committing to larger purchases.
Weight Fill Materials Compared
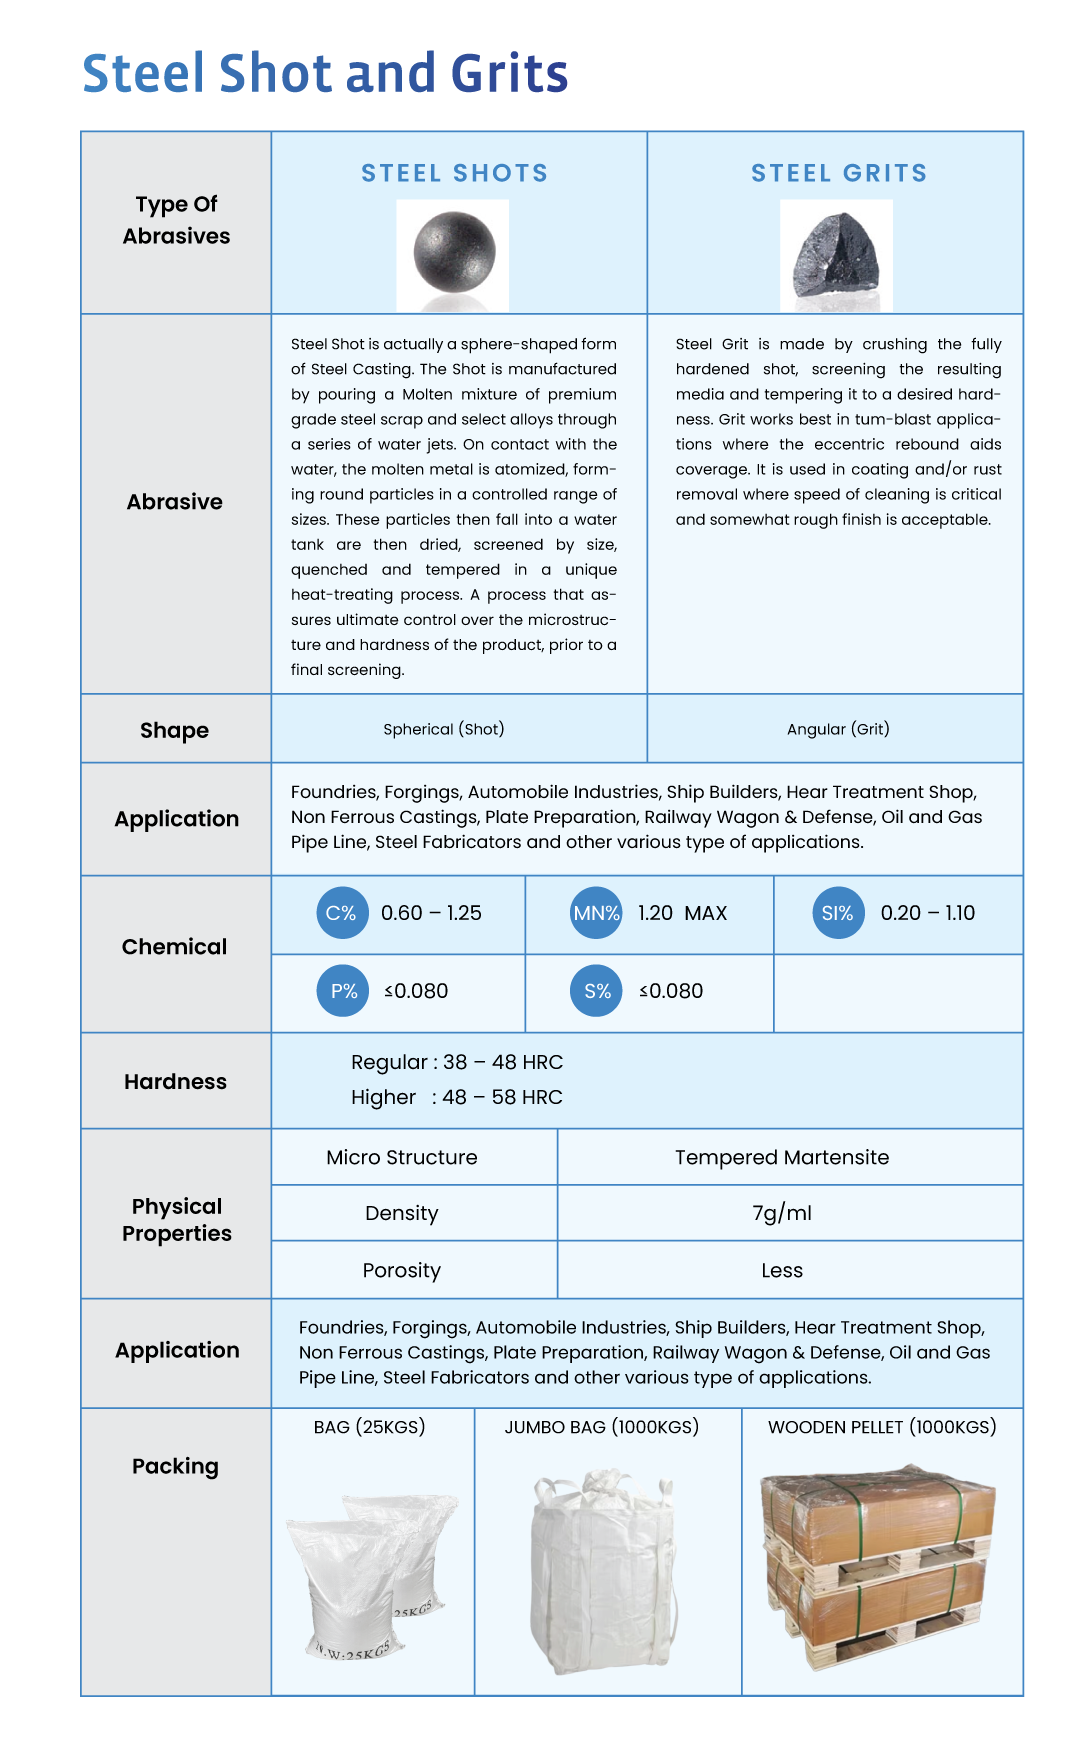
The filling material dramatically affects performance and cost. Steel shot provides the densest option—just one cup equals 1.5 pounds—creating compact weights that stay put during dynamic movements like burpees. Sand costs pennies per pound at hardware stores and molds to your ankle shape, though you’ll need nearly triple the volume for equivalent weight.
Dried rice works as a safe, biodegradable filler for lighter weights (1-3 pounds), while small aquarium gravel balances cost and density for mid-range projects. Critical safety note: Avoid lead shot unless you have proper toxic materials handling experience—it poses serious health risks during filling and potential leakage.
Hardware and Fastening Systems
Industrial-strength Velcro strips (2-4 inches wide) create the most reliable closure system that withstands sweat and repeated opening. Look for hook-and-loop rated for outdoor use—it outlasts basic craft versions by 3-5 times during rigorous testing. Elastic webbing adds crucial flexibility for sizing variations, while plastic side-release buckles provide quick on/off access between circuit training stations.
Size Charts and Weight Distribution
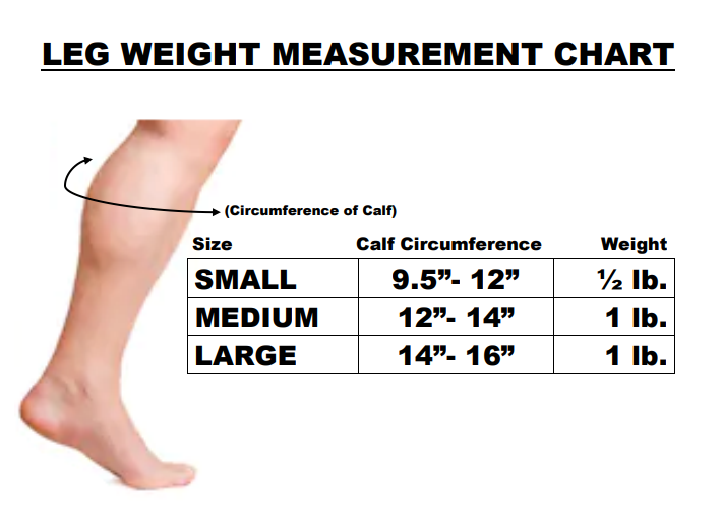
Custom Fit Measurements
Measure your ankle at its narrowest point above the bone, then add 2-3 inches for overlap. This prevents the dangerous tourniquet effect that restricts circulation during extended wear. Standard sizing follows these tested dimensions:
- Small: 10-12 inches long, 4-5 inches wide, holds 1-5 pounds
- Medium: 12-14 inches long, 5-6 inches wide, holds 2-8 pounds
- Large: 14-16 inches long, 6-7 inches wide, holds 3-10 pounds
Weight Distribution Formula
Uneven weight causes joint strain and throws off your form. Create 4-8 individual pockets across each weight using this simple math: total desired weight ÷ number of pockets = weight per section. For a 5-pound weight with 5 pockets, each section holds exactly 1 pound, preventing the lopsided feeling that ruins your leg lift technique.
Step-by-Step Construction Process
Create Your Pattern Template
Start with a rectangle based on your ankle measurement plus 2 inches for overlap, with width between 4-6 inches depending on desired weight capacity. Round corners using a drinking glass—sharp corners catch on workout pants and eventually fray. Mark horizontal lines every 1.5 inches for pocket placement, starting 1 inch from the top edge.
Pro tip: Cut your first pattern from cereal box cardboard. This free template lets you test the fit before cutting expensive fabric, saving both time and materials.
Cut and Prepare Fabric Pieces
Cut two identical rectangles from your main fabric for each ankle weight. If adding structure, cut matching interfacing pieces and fuse them to the fabric’s wrong side using a press cloth and medium heat. Cut Velcro strips 2 inches longer than your ankle circumference for secure overlap.
For pocket-style weights, cut additional 3×4 inch rectangles—one for each pocket section. These small pieces become individual weight holders that prevent shifting during movement, creating professional-level weight distribution.
Basic Sewn Weight Assembly
Layer fabric pieces right sides together and sew around the perimeter with a 1/2-inch seam allowance, leaving a 3-inch opening. Turn right-side-out and press flat. Create vertical channels by sewing straight lines from bottom to top edge—these hold fill material in place during exercise.
Use a funnel to add weight material gradually, checking a kitchen scale every few scoops. Close the opening with a ladder stitch for an invisible finish, then attach Velcro strips to both ends with reinforced bar-tack stitching at stress points.
Advanced Pocket System Construction

For adjustable weights, create individual removable packets using 4×4 inch fabric squares. Sew these into small pouches, fill each with measured amounts (0.5, 1, or 2 pounds), then add zipper closures. Attach permanent pockets to your main weight using bar-tack stitches that withstand thousands of openings.
This system lets you customize resistance instantly—use 2 pounds for walking, 5 pounds for leg lifts, and remove packets entirely for physical therapy movements, making your DIY ankle weights infinitely versatile.
Weight Adjustment and Safety Features
Removable Weight Packet System
Create a color-coding system for quick identification: red packets equal 2 pounds, blue equals 1 pound, yellow equals 0.5 pounds. Store unused packets in a mesh bag clipped to your gym bag for immediate access between sets.
Critical safety warning: Never exceed 10 pounds per ankle unless directed by a physical therapist. Excessive weight alters gait mechanics by 23% according to biomechanical studies, dramatically increasing knee joint stress.
Comfort Padding Solutions
Add 1/4-inch foam backing or fleece lining to prevent the stiff, uncomfortable feeling of basic weights. Sew these layers to the interior surface before final assembly, ensuring they don’t interfere with Velcro attachment areas. For hot climates, incorporate mesh ventilation strips along edges to reduce sweat buildup by 40%.
Maintenance and Troubleshooting
Cleaning and Care Instructions
Empty all removable packets before cleaning. Hand wash fabric weights in mild detergent, then air dry completely to prevent mildew. For fixed weights, spot clean with a damp cloth and fabric refresher spray. Never submerge steel shot or sand-filled weights—water exposure causes rust or mold within 48 hours.
Common Problems and Solutions
Weight shifting during exercise: Add more internal compartments or switch to finer fill material like steel shot. Dense materials stay put 70% better than sand or rice during dynamic movements.
Velcro losing grip: Replace with industrial-strength hook-and-loop tape rated for outdoor use. Sew new Velcro in multiple directions for maximum hold—this simple fix extends Velcro lifespan by 300%.
Final Safety and Usage Tips
Start with lighter weights than you think you need—1-2 pounds per ankle is ideal for beginners. Gradually increase by 0.5-1 pound increments weekly to avoid joint strain. Never wear weights during high-impact activities like running; save them for controlled movements like leg lifts, walking, or rehabilitation exercises.
Check your DIY ankle weights monthly for seam stress or Velcro wear. Replace components at the first sign of failure rather than risking injury. With proper construction and care, your homemade weights will outlast commercial versions while saving you $50-150. Now that you know how to make an ankle weight that fits perfectly and performs flawlessly, you’re ready to transform ordinary workouts into muscle-building sessions that actually work.


