
Your wrists buckle under heavy weight like a snapped cable, redirecting hard-earned strength into wasted motion instead of lifting power. That painful backward bend during your bench press? It’s stealing pounds from your max and risking joint damage. Properly applied weight lifting wrist wraps transform unstable joints into rock-solid pillars, locking your wrists in perfect alignment so every ounce of force drives the bar upward. Whether you’re chasing a 315 bench or perfecting overhead stability, mastering how to put on weight lifting wrist wraps instantly boosts performance while protecting delicate ligaments.
Most lifters treat wrist wraps as simple accessories rather than precision tools. But slapdash application creates dangerous gaps in support or cuts off circulation mid-lift. The right technique creates a custom scaffold around your wrist joint—snug enough to prevent hyperextension yet flexible for natural movement. This guide reveals exact positioning, tension control, and exercise-specific strategies you won’t find in generic tutorials. Skip the trial-and-error agony and learn to apply wraps like a pro lifter from day one.
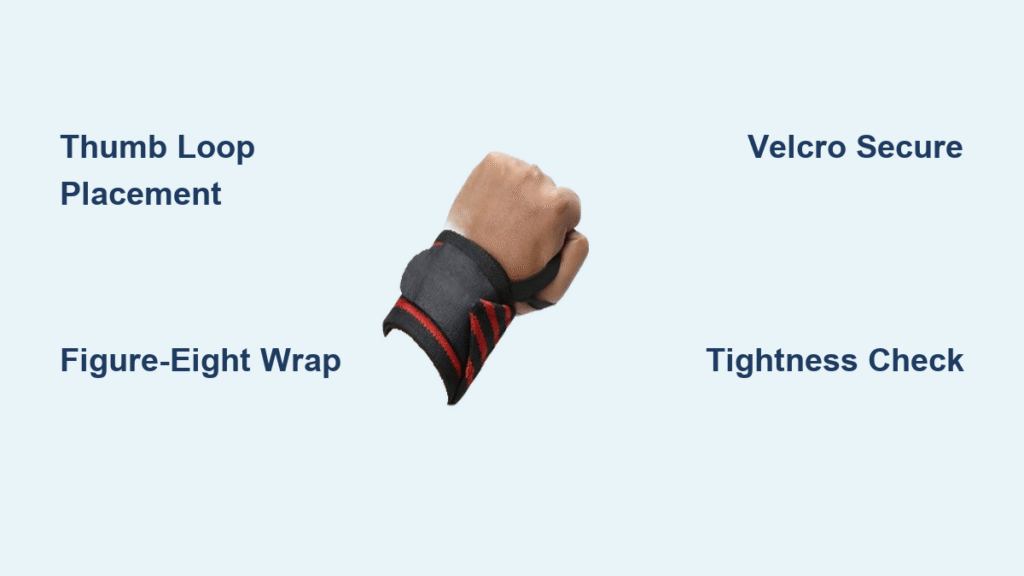
Thumb Loop Velcro Wrap Application Steps
Correct Loop Placement and Initial Wrap
Slide your thumb through the loop so it sits snugly at the base of your thumb (where thumb meets palm), not over the knuckle. Position the wrap starting just below your wrist crease with fingers extended and palm facing up. Hold the loose end firmly and wrap once completely around your wrist joint—this anchor layer must sit precisely over the bony protrusions on either side of your wrist. Critical mistake: Placing the loop too high causes painful rubbing during presses; too low lets the wrap slide down your hand.
Progressive Overlapping Technique
After the first wrap, move the material slightly upward to cover the top half of your previous layer. Then drop back down to wrap just below the joint, overlapping the lower half of the prior wrap. Continue this figure-eight pattern, alternating above and below the wrist joint with each revolution. Pro tip: Each new layer should cover at least 50% of the previous wrap’s width—less creates unstable gaps where the wrap can unravel under load. Stop wrapping when 3-4 inches of material remain for securing.
Velcro Securing and Final Check
Press the velcro end firmly against itself with a downward motion (not sideways) to prevent peeling during lifts. Test tightness by making a fist: your fingers should feel supported but not tingly or purple. Now extend your wrist slightly backward against a wall—the wrap should stop movement at neutral position (no backward bend). Warning: If you can’t fully close your hand or feel numbness, loosen immediately and re-wrap.
Twist and Tuck Style Wrap Mastery
Base Layer Setup Without Thumb Loop
Unlike velcro wraps, these require precise tension control from the start. Hold the string end in your opposite hand and wrap directly over your wrist joint three times to build a stable foundation. Keep consistent pressure—too loose and the wrap shifts; too tight and you’ll struggle to tuck the string later. Position your hand as if gripping a barbell, with wrist in neutral alignment (no flexion or extension).
Strategic Figure-Eight Pattern
After the base layer, alternate wrapping above and below the wrist joint while maintaining even tension. Move higher for the next wrap to cover your forearm, then drop lower to secure the hand side. Key insight: Olympic lifters use this pattern to support front-rack positions while allowing snatch reception mobility. Leave 4-6 inches of wrap plus the string for final tucking—any shorter and you won’t have enough material to secure it.
Micro-Adjustment Tucking Technique
Wrap the final layer directly over your wrist joint, then thread the string under 2-3 existing layers at a 45-degree angle. Pull gently to tighten, then twist the entire wrap clockwise to increase support (counterclockwise to loosen). Expert note: The twist-and-tuck method lets you fine-tune tightness between reps—crucial for cleans where wrist demands change mid-lift. Verify security by shaking your hand vigorously; no string should pop loose.
Exercise-Specific Tightness Control

Powerlifting Bench Press Protocol
Crank velcro wraps to 100% tightness using progressive layers: first wrap at 60% tension, second at 80%, final at maximum. Focus compression directly over the wrist joint bones. Competition rule: Remove thumb loops after securing—most federations ban them during lifts. Test by holding an empty bar: your wrists must stay rigidly stacked under the bar with zero backward bend.
Overhead Press Support Settings
Use moderate tightness (70-80%) with 18-24″ wraps positioned slightly higher on your forearm. This accommodates the natural wrist extension needed for proper bar path during military presses. Critical check: Press an empty bar overhead—if your wrists bend forward beyond neutral, loosen the wrap; if they collapse backward, tighten it.
Olympic Lifting Flexibility Balance
Opt for 24-36″ flexible wraps at 60-70% tightness. Wrap slightly looser on your dominant hand for better bar control during snatches. Pro strategy: During front squats, the wrap should support your wrist in the rack position while allowing enough mobility to receive cleans. If your elbows drop during lifts, the wraps are too tight.
Deadly Wrapping Mistakes That Cause Injury

Circulation-Cutting Tightness
Purple fingertips or numbness means you’ve restricted blood flow—a common error when lifters “crank for max support.” Immediate fix: Loosen wraps by one layer and re-secure. Proper tightness should limit wrist extension but never impair grip strength. If you can’t crush a tennis ball after wrapping, you’ve gone too far.
Misaligned Joint Coverage
Wraps positioned mostly above the wrist joint (on your forearm) sacrifice grip strength and stability. Conversely, wraps sitting too low on your hand miss the joint entirely. Visual cue: The center of your wrap must align with the bony bumps on both sides of your wrist—like a belt cinched around your joint’s “waist.”
Incomplete Layer Overlap
Gaps between wraps create weak points where material unravels under heavy load. Quick test: Press your thumb against the wrap—if layers shift or separate, each revolution didn’t cover enough of the prior wrap. Always overlap by at least half the wrap’s width for bombproof security.
Between-Sets Maintenance Protocol
Loosen wraps immediately after heavy sets to restore circulation—never leave them tight during rest periods. For velcro styles, peel back just enough to relieve pressure while keeping layers aligned. Time-saving hack: Mark your optimal tightness point with a small dot of permanent marker; re-securing takes 10 seconds between sets. If using twist-and-tuck wraps, untwist slightly for loosening then retwist to original tension.
Strategic Usage Guidelines
Deploy wraps only for working sets above 85% of your 1-rep max on pressing movements. Avoid dependency: Train one weekly pressing session wrap-free to build natural wrist strength—your unwrapped performance should improve alongside wrapped numbers. Replace wraps every 6-12 months when velcro loses grip or fabric shows fraying. Pro tip: Hand-wash in cold water monthly; never machine-dry, as heat destroys elastic fibers.
Mastering how to put on weight lifting wrist wraps turns shaky lifts into ironclad presses. The right technique isn’t about maximum tightness—it’s about precision engineering for your unique biomechanics. Apply these steps before your next heavy bench session, and feel the difference in wrist stability and force transfer. Your joints will thank you for years of pain-free lifting, while your PRs climb with every properly wrapped rep. Now go stack those plates—and keep your wrists stacked too.


