

That dusty weighted vest in your closet could transform your daily walk into a calorie-torching, bone-strengthening powerhouse—if you avoid the critical mistakes 90% of beginners make. By strategically adding just 5-10% of your body weight to your torso, you’ll elevate your heart rate 5-15 beats per minute, boost calorie burn by up to 15%, and build functional strength without joint-jarring impact. Yet improper loading or progression triggers knee pain, back strain, and abandoned vests within weeks. This guide reveals exactly how to integrate weighted walking safely, with science-backed progression protocols and real-world integration hacks used by physical therapists and martial artists.
Why Your Body Weight Determines Vest Weight (Not Guesswork)
Starting with the wrong load is the fastest path to injury. Never begin with more than 5-10 pounds total weight, regardless of your size. This conservative baseline allows tendons and bones to adapt to increased ground-reaction forces. After 2-3 weeks of pain-free walking, calculate your true target load: 5-10% of your current body weight. Exceeding this threshold during walking dramatically increases shear forces on knees and spine.
Critical weight-to-body ratios:
– 120 lb person → Max 12 lb vest (10% = 12 lb)
– 150 lb person → Max 15 lb vest (10% = 15 lb)
– 180 lb person → Max 18 lb vest (10% = 18 lb)
– 200 lb person → Max 20 lb vest (10% = 20 lb)
How to Test If Your Vest Is Too Heavy
Stand tall with vest secured. Perform 10 bodyweight squats while maintaining:
– Upright torso (no forward lean beyond 15 degrees)
– Heels planted (no lifting off ground)
– Full range of motion (thighs parallel to floor)
If you wobble, round your back, or cut depth short, reduce weight by 25%. This simple test prevents the forward trunk lean that causes lower-back spasms during walks.
Stop Vest Bouncing With Military-Grade Fit Secrets

A shifting vest transfers load to your neck and shoulders, causing upper-trap strain within minutes. The fix lies in strategic compression—not just tightness. Your vest must sit 2-3 cm above your navel to avoid hip impingement during stride. Test fit by jumping in place while swinging arms vigorously; zero vertical movement indicates proper tension.
3 Non-Negotiable Vest Features
- Dual-panel weight distribution (front + back pockets) – Prevents forward lean
- Adjustable side straps – Fine-tune compression mid-walk as you sweat
- Breathable neoprene/Cordura fabric – Mesh panels reduce heat stress by 40%
Budget-friendly starter vest: Zelus 4-10 lb adjustable model ($35). The removable 1 lb sandbags let you micro-progress by just 5% weekly—critical for avoiding plateaus. Skip single-compartment “backpack-style” vests; they concentrate load on lumbar spine.
Your 4-Week Walk-Through Plan (No Gym Required)
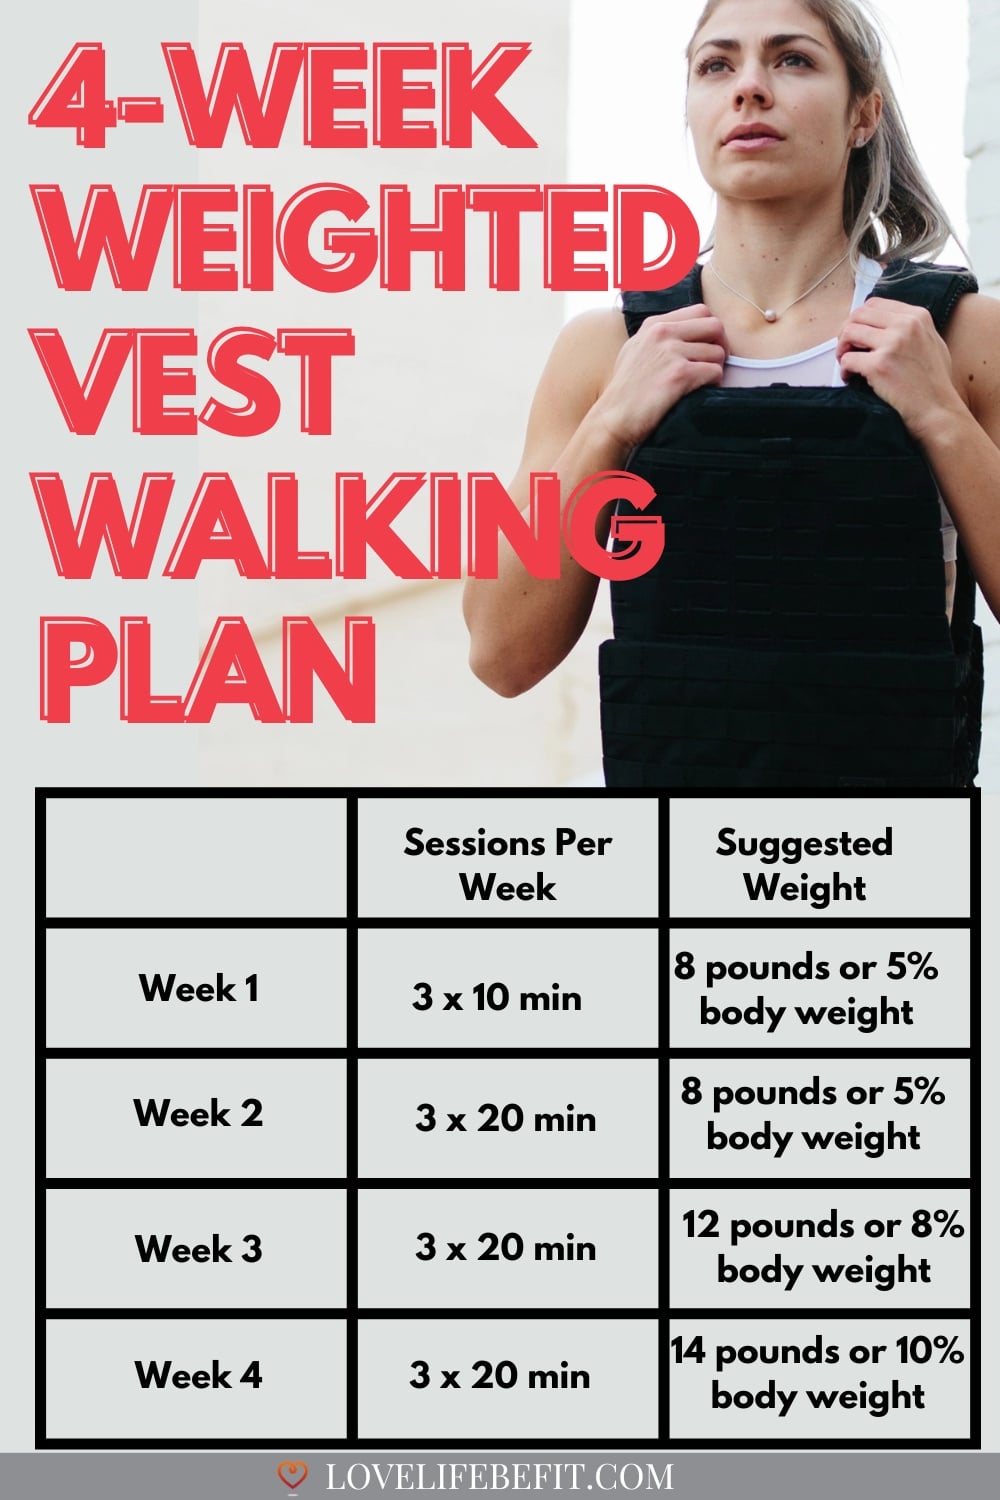
Week 1-2: The Posture Reset Protocol
- Load: 5-8 lb or 5% body weight
- Duration: 10-15 minutes on flat pavement
- Pace: Conversational (RPE 4-5/10—you could sing)
- Key focus: Engage transverse abdominis by drawing navel toward spine
Why this works: The light load heightens proprioception. Users report immediate posture corrections—shoulders retract, head stacks over hips—without conscious effort.
Week 3-4: Hill Power Builder
- Load: Add 2-5 lb if Week 2 felt easy (RPE ≤6)
- Duration: 20 minutes OR 2×10 min with 5-min rest
- Terrain: Add 3% inclines (use treadmill or gentle neighborhood slopes)
- Stride cue: Drive through heels to activate glutes
Pro tip: Walk backward up inclines for 2 minutes per session. This forces quadriceps to control eccentric loading, building tendon resilience.
When to Stop Walking Immediately (Red Flags)
Ignoring these symptoms risks stress fractures or disc herniation:
– Sharp knee pain (especially under kneecap)
– Lower back spasms that persist after removing vest
– Numbness/tingling in legs or feet
– Forward head posture you can’t correct
Normal adaptation vs. danger: Mild quad/glute soreness 24-48 hours post-walk? Expected. But upper-trap ache or dizziness means your load exceeds cervical spine tolerance—reduce weight by 30% next session.
Turn Mundane Errands Into Strength Sessions
Weighted walking thrives on stealth integration. These micro-sessions build consistency without “workout” time:
Grocery Store Power Circuit
- Wear vest while pushing cart (add 2-4 lb to handle with sandbags)
- Perform 10 single-leg calf raises per aisle while waiting
- Carry bags with arms extended (engages serratus anterior)
Result: A 15-minute shop delivers 200+ extra calories burned versus unloaded walking.
Commute Hack for Office Workers
Park 0.5 miles from work. Wear vest during final walk while:
– Swinging arms across body (activates rhomboids)
– Walking on curbs (improves ankle proprioception)
– Holding posture during phone calls (core bracing)
Data point: Users gain measurable VO₂ max improvements in 8 weeks at just 3x weekly sessions.
Your 3-Month Transformation Timeline
2-Week Proof Points
- Heart rate stays elevated 5-8 bpm at same walking pace
- Automatic posture corrections during desk work
- Smoother gait with reduced “bouncy” stride
3-Month Breakthroughs
- 12% faster uphill walking speed at same effort level
- Measurable bone density gains in femoral neck (per DEXA scans)
- Eliminated morning stiffness in knees/hips
Long-Term Perks You Can’t Fake
After consistent 2+ years:
– Metabolic rate remains 8-10% higher than age-matched peers
– Zero osteoporosis-related fractures (critical for women over 50)
– Jiu-jitsu grapplers report 22% stronger leg drive under opponent’s weight
Weighted Walking Quick-Start Checklist
| Parameter | Your Target | Danger Zone |
|---|---|---|
| Starting weight | ≤10 lb OR 5% body weight | >10% body weight |
| Max walking load | 10% body weight | Running/jumping: ≤5% |
| First session | 10 min flat terrain | Hills/inclines |
| Progression rate | +2-5 lb every 3 weeks | Weekly jumps |
| Safety stop signal | Forward head posture | “No pain, no gain” |
Pro tip: Always remove the vest before stretching. The added weight during cool-downs compresses spinal discs, counteracting bone density benefits. Instead, perform post-walk stretches like standing quad pulls against a wall—hold 30 seconds per leg while focusing on deep diaphragmatic breathing to reset heart rate.
Why Your Vest Is an Invisible Gym (Not Just Gear)
That neglected vest in your closet becomes your most powerful fitness tool when used correctly. Unlike treadmills or weights, it integrates seamlessly into life: walking kids to school, coffee runs, or conference calls. The secret lies in respecting progressive overload—your body adapts to 5% weight increases over 3 weeks, not overnight. Start at half your target weight for the first session. Walk just 8 minutes. Celebrate finishing. Tomorrow, add 2 minutes. In 30 days, you’ll walk 28 minutes with 8 lb feeling effortless—while burning 12% more calories than unloaded walks. This isn’t fitness theory; it’s the protocol used by physical therapists to rebuild bone density in osteoporosis patients. Your next step? Grab that vest, check the navel-to-vest gap, and walk to the mailbox. That’s where real transformation begins—one mindful step at a time.


