
Struggling to hold a plank without wrist agony? You’re not alone—90% of weight-bearing wrist pain stems from limited extension mobility, sabotaging everything from basic pushups to advanced handstands. When your wrists can’t handle the load, your entire upper body training grinds to a halt. This isn’t just frustration; it’s a preventable breakdown in foundational strength. Whether you’re a yogi stuck in downward dog or a calisthenics newbie avoiding floor work, targeted weight bearing wrist exercises rebuild the critical stability you’re missing.
Most people jump straight into demanding positions without preparing their wrists, creating micro-tears in ligaments and compressing delicate joint structures. The solution isn’t avoiding pushups—it’s systematically conditioning your wrists to handle the load. In this guide, you’ll get the exact progression physical therapists use: mobility drills to unlock restricted joints, strengthening protocols that build bulletproof tendons, and functional transitions that move you safely from wall pushups to full floor work. No more wrist pain means finally accessing the upper body strength you’ve been training for.
Required Equipment for Weight Bearing Wrist Exercises
Skip expensive gadgets—start with items already in your kitchen. Light dumbbells (1-3 pounds) are ideal, but water bottles or soup cans work perfectly as substitutes. You’ll need a stable table for forearm support during strengthening moves and resistance bands specifically for extension mobilization. The band anchors under your foot to create traction that literally pulls your wrist bones apart, reducing joint compression.
Critical setup tip: Always position your forearm fully supported on the table edge with your wrist hanging freely. If your elbow hovers above the surface, you’ll engage shoulder muscles instead of isolating the wrist. Beginners should skip weights entirely for the first week—your body provides sufficient resistance when performed correctly.
Fix Limited Wrist Extension: The 90% Cause of Pushup Pain

Tight wrist capsules block the 60-80 degrees of extension needed for pain-free weight bearing. Without this mobility, your joints jam under pressure, triggering sharp pain. Band-assisted mobilization creates immediate relief by sliding your carpal bones into proper alignment.
Band Mobilization That Unlocks Stuck Wrists
Anchor a resistance band below the two bony wrist prominences (the styloid processes). Pull the band taut and secure the end under your foot. Start with your wrist neutral, then slowly press your palm toward the floor while maintaining band tension. Perform 15-20 controlled reps, stopping before pain begins. This isn’t stretching—it’s joint distraction that creates space where compression previously caused pain.
Visual cue: Watch for the “hinge point” where your wrist naturally wants to bend. Work just beyond this threshold for 2 seconds per rep. Re-test your pushup position after 3 sets—you should immediately feel reduced pressure on your wrist bones.
4 Weight Bearing Wrist Exercises That Build Pushup Strength
These movements target the exact muscles that collapse during handstands. Start without weights, adding resistance only when you complete 15 perfect reps. Never sacrifice form for heavier loads—this defeats the purpose.
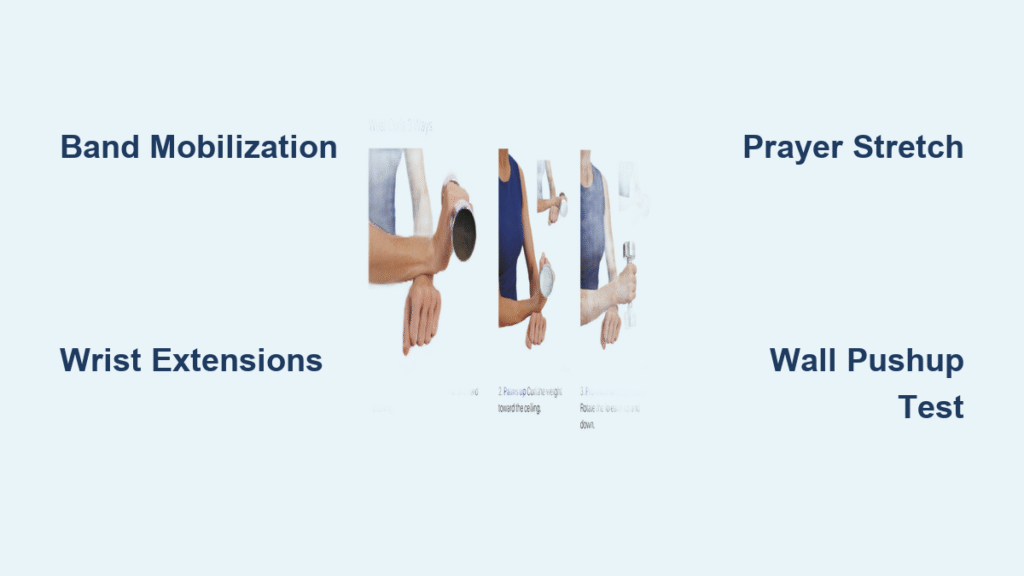
Dumbbell Wrist Extensions for Pushup Stability
Rest your forearm on a table, wrist hanging off the edge, palm down. Hold a 1-3 pound weight (water bottle works). Lift the back of your hand toward the ceiling while keeping your forearm glued to the surface. Hold the top position for 3 seconds—this is where tendon strength builds—then lower slowly over 4 seconds. Complete 2 sets of 12 reps.
Pro mistake to avoid: Letting your elbow drift off the table. This recruits forearm muscles instead of isolating the wrist extensors. Place your free hand on your working elbow to prevent movement.
Reverse Flexion for Handstand Control
Flip your hand palm-up while maintaining the same forearm position. Lift your palm toward the ceiling against the weight’s resistance. The top position should feel like you’re “shelving” your hand—fingers pointing straight ahead. Hold for 2 seconds before lowering. Do 2 sets of 10 reps.
Why this matters: These flexors stabilize your wrist when your palm faces the floor during handstands. Weakness here causes buckling under load.
Supination/Pronation for Rotational Strength
Rest your forearm sideways on the table with thumb up. Hold a dumbbell like a hammer. Rotate your hand palm-up (supination), then slowly reverse to palm-down (pronation). Perform 10 reps each direction for 2 sets.
Key insight: Uneven surfaces during parkour or yoga demand this rotational control. Skipping it invites side-to-side wrist wobble under load.
Prayer Stretch and Steeple Stretch: Wrist Flexibility for Handstands

Tight forearms pull your wrist into painful positions during weight bearing. These two stretches directly release the fascia causing resistance.
Prayer Stretch Technique That Relieves Compression
Press palms together below your chin, fingers pointing up. Keeping fingers touching, slowly lower your hands until you feel tension along your inner forearms. Hold 20 seconds—this is the minimum time to affect connective tissue. Repeat 3 times.
Critical adjustment: If your palms won’t touch, press fingertips together only. Forcing full palm contact strains tendons. The stretch should feel like “unfurling” your inner arms.
Dynamic Steeple Stretch for Finger Control
From prayer position, spread fingers wide while keeping palms pressed together. Separate palms 1 inch, then rejoin them. Repeat 15 times. This isn’t passive stretching—it actively trains finger independence crucial for hand balancing.
Pro tip: Do this hourly during desk work. It prevents the forearm tightness that sabotages evening workouts.
7-Week Progression Plan: From Wrist Pain to Pain-Free Pushups
Weeks 1-2: Master mobility work and bodyweight-only exercises. Spend 5 minutes daily on band mobilization before any wrist loading.
Weeks 3-4: Add 1-pound resistance. Complete 2 sets of 12 reps per exercise with perfect form.
Weeks 5-6: Progress to 2-3 pounds for 3 sets. Introduce incline pushups (hands on countertop).
Week 7+: Begin floor pushups after passing the wall test (see below).
Red flag: Sharp pain during week 3 means you’re advancing too fast. Drop back to bodyweight for 3 days. Consistency beats speed—your tendons need 48 hours to adapt.
Transition to Floor Pushups: The Wall-to-Floor Progression
Never jump straight to floor work. Start with hands on a wall at shoulder height. Perform 10 slow pushups, lowering for 3 seconds. If pain-free, move to a countertop. Continue lowering the surface weekly until you reach the floor.
Wall Pushup Test for Wrist Readiness
Place hands on wall, feet back until body forms 45 degrees. Do 15 pushups. If your wrists feel:
– Burning but no sharp pain → Continue at this height
– Numbness or tingling → Stop immediately (nerve compression)
– Comfortable → Drop to lower surface next session
Time-saving hack: Do these during TV commercials. 3 sets daily builds tolerance faster than marathon sessions.
Stop Immediately: 3 Red Flags During Weight Bearing Wrist Exercises
- Numbness/tingling: Indicates median nerve compression (early carpal tunnel sign). Stop and consult a physical therapist.
- Sharp joint pain: Different from muscle fatigue—this means you’re straining ligaments. Reduce range of motion immediately.
- Swelling after exercise: Your tissues are inflamed. Ice wrists and skip loading for 48 hours.
Mild forearm soreness is normal. Joint pain is not. When in doubt, regress to easier variations for 3 days.
2x Weekly Maintenance: Keep Your Wrists Strong for Handstands
Once pain-free, maintain gains with this 10-minute routine:
– Band mobilization: 2 sets of 15 reps
– Wrist extensions: 1 set of 15 with 2 lbs
– Prayer stretch: 3 holds of 20 seconds
Pro efficiency: Pair wrist flexion with extensions (no rest between). This superset saves time while balancing muscle groups. Skipping maintenance causes regression within 2 weeks—your wrists adapt quickly to disuse.
5 Must-Pass Tests Before Attempting Full Pushups
Before hitting the floor, confirm you can:
1. Hold a plank for 45 seconds with zero wrist discomfort
2. Complete 20 wall pushups with slow negatives
3. Perform 3 sets of 15 wrist extensions with 3 lbs
4. Lower hands past chin level in prayer stretch
5. Hold a 15-second forearm stand against the wall
Failure on any test means your connective tissue isn’t ready. Pushing through invites injury that sets you back months. Retest weekly until all boxes are checked—then start with knee pushups to reduce load.
Strong wrists transform your entire upper body training. By dedicating just 10 minutes daily to these weight bearing wrist exercises, you’ll move from pain avoidance to confident handstands within 6 weeks. Remember: Your wrists aren’t “weak”—they’re untrained for the specific demands you’re placing on them. Track your progress in a notes app, celebrating when you add your first pound of resistance or hold that plank 5 seconds longer. The path to pain-free pushups starts today—one controlled rep at a time.


