
You’ve been doing the same bodyweight exercises for months, but your progress has stalled. Push-ups feel too easy, squats no longer challenge you, and you’re not seeing the results you want. Weight vest training exercises solve this problem by adding strategic resistance that instantly transforms basic movements into powerful muscle-building, fat-burning workouts. Research shows weighted vest training increases calorie expenditure by up to 15% while simultaneously building functional strength and improving bone density—making it one of the most efficient training methods available today.
Unlike traditional weight training that isolates specific muscles, weight vest training exercises distribute resistance across your entire torso, forcing your core to engage constantly while amplifying every movement. This approach delivers real-world strength gains that translate directly to athletic performance, tactical readiness, or everyday activities. Whether you’re an athlete seeking an edge or someone wanting more from home workouts, adding a weight vest creates immediate intensity without expensive equipment or complex setups.
Weight Vest Training Exercises That Outperform Traditional Resistance Methods
Weight vest training exercises operate on a fundamental principle: increasing body workload through uniform resistance distribution. When you add 5-15% of your body weight across your torso, every movement becomes significantly more challenging while maintaining natural movement patterns. Unlike dumbbells or barbells that alter your center of gravity, a properly fitted vest keeps resistance centered, preserving proper biomechanics during push-ups, squats, or lunges.
The metabolic impact is substantial—weighted vest training boosts cardiovascular fitness while simultaneously building muscular endurance. During walking sessions with just 10% body weight, heart rate increases by 10-15 beats per minute compared to unweighted walking. For bodyweight exercises, adding a vest transforms standard movements into strength-building powerhouses: push-ups become chest and shoulder blasters, squats target quads with unprecedented intensity, and planks evolve into core-stabilizing challenges that traditional ab work can’t match.
Why 3-15% Body Weight Is the Sweet Spot for Most Users
Start with 3-5% of your body weight if you’re new to resistance training—approximately 5-8 pounds for a 150-pound person. This seemingly light load creates immediate intensity without compromising form. Intermediate users progress to 8-15% body weight for strength and power development, while advanced athletes may utilize up to 20% for specific conditioning goals.
The magic happens in the stabilization demands: your core muscles fire continuously to maintain balance under the added load, creating full-body engagement that isolated weight training can’t replicate. For example, weighted vest squats force your entire kinetic chain to work harder—from ankle stabilizers to spinal erectors—making these exercises exceptionally effective for functional strength development.
Selecting Your First Weight Vest: Critical Fit and Function Factors

Why Adjustable Weight Packs Beat Fixed-Weight Designs for Long-Term Progress
Choose an adjustable vest with removable weight packets rather than fixed-weight designs. This allows you to progress systematically by adding 2-3% body weight every 2-3 weeks as your strength improves. Look for vests that distribute weight evenly across your chest and upper back—not sagging toward your waist—which maintains proper biomechanics during dynamic movements like burpees or jump squats.
The fit must be snug but not restrictive, with adjustable straps that prevent bouncing during high-impact exercises. Quality vests feature breathable mesh panels, padded shoulders, and secure weight compartments that won’t shift during movement. Avoid cheap vests with rigid plates that limit shoulder mobility or uneven weight distribution that forces compensatory movement patterns.
Weight Vest Safety Protocol: Avoiding Injury While Maximizing Gains
Immediate Warning Signs That Signal You Must Reduce Weight
Form breakdown means immediate weight reduction—if your push-up depth decreases or squats become shallow within two minutes, remove 2-5 pounds immediately. Sharp joint pain, unusual fatigue, or dizziness signal it’s time to deload completely. Maintain neutral spine alignment throughout all movements, as the added weight dramatically amplifies poor form consequences.
Breathe naturally during exercises—exhale during exertion phases—and never hold your breath under load. Recovery requirements increase significantly with vest training, so schedule 48 hours between intense sessions and monitor sleep quality closely. Expect delayed muscle soreness in your core from constant stabilization demands, especially during the first two weeks of training.
Upper Body Weight Vest Training Exercises That Build Real Strength
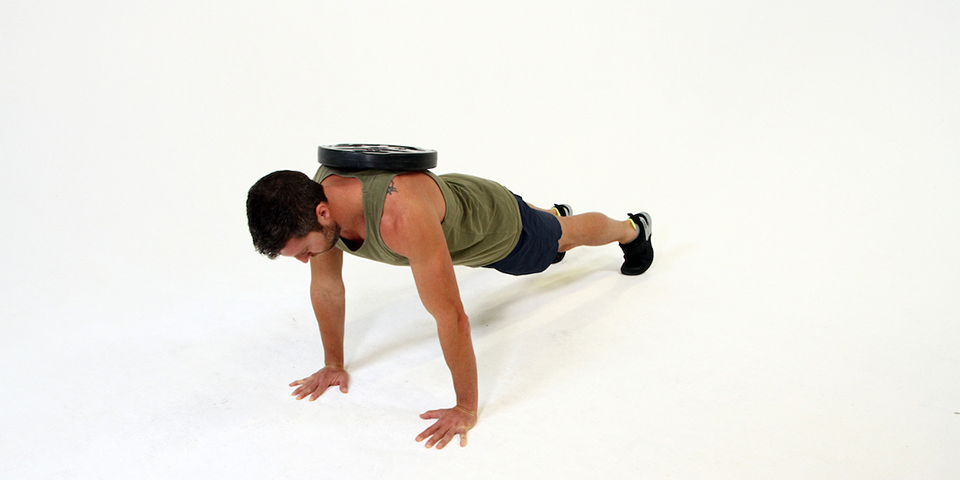
Standard Weighted Push-Ups: The Ultimate Chest Builder
Standard vest push-ups transform this basic movement into a serious chest, shoulder, and triceps developer while forcing constant core engagement. Place hands shoulder-width apart, lower until your chest nearly touches the ground, then drive up explosively. The vest’s distributed weight creates unique resistance that builds functional pressing strength better than bench pressing for most athletes.
Begin with 3 sets of 8-12 reps, focusing on perfect form before increasing weight. For progression, elevate your feet or add explosive elements like plyometric push-ups once you can complete 15+ clean reps. Avoid the common mistake of allowing hip sag or uneven shoulder movement—your body should form a straight line from head to heels throughout each rep.
Lower Body Weight Vest Exercises for Explosive Power Development
Weighted Jump Squats: Triple Your Lower Body Power Output
Jump squats with a light vest (5-10% body weight) build explosive lower body power that transfers directly to athletic performance. Perform with proper squat depth first—hips below knee level—before adding the jump element. Lower under control, then explode upward with enough force to leave the ground, landing softly on the balls of your feet before immediately transitioning into the next rep.
Limit to 3 sets of 8-10 reps to protect knee joints while maintaining jump quality. The vest’s weight makes the eccentric (lowering) phase significantly harder, creating tremendous strength-building potential. Avoid the critical error of sacrificing depth for height—focus on quality movement over maximum jump height, especially when first adding resistance.
Core-Strengthening Weight Vest Exercises You’re Not Doing
Weighted Planks: The Core Stabilizer That Builds Bulletproof Abs
Weighted planks transform this basic isometric hold into a serious core strengthener that challenges even advanced athletes. A standard plank held for 60-90 seconds becomes challenging at just 30-45 seconds with a vest adding 5-10% body weight. Position yourself in perfect plank alignment—elbows under shoulders, body straight from head to heels—and maintain this position while the added weight forces deeper core engagement.
Progress by adding shoulder taps (touching opposite shoulder while maintaining plank position) which dramatically increases anti-rotation challenge. The vest weight magnifies hip rotation forces, building core stability that protects your spine during heavy lifting and athletic movements. Avoid the common mistake of hiking or sagging hips—use a mirror or partner to check your alignment throughout each hold.
Weight Vest Training Programs: Beginner to Advanced Progression
Week 1-4 Beginner Protocol: Building the Foundation Safely
Start with 3-5% body weight for 2 sessions weekly using this beginner structure:
– Day 1: Squats 3×10, Push-ups 3×8, Plank 3x30s
– Day 2: Walking lunges 3×10/leg, Step-ups 3×10/leg, Bird-dog 3×10
– Day 3: REST or light walking with vest
Focus exclusively on perfect form during these initial weeks. The vest should feel challenging but not overwhelming—your movement patterns should remain identical to unweighted versions. Increase to 5-8% body weight in weeks 3-4 only if you complete all reps with perfect technique. Never progress weight while form deteriorates; it’s better to stay at the same load for an extra week than to rush progression and risk injury.
HIIT Weight Vest Protocols for Maximum Fat Burning
Tabata Vest Training: 4 Minutes That Torch Fat
Perform this high-intensity protocol twice weekly for dramatic metabolic benefits:
– 20 seconds on, 10 seconds off, 8 rounds total
– Exercises: Burpees, Mountain climbers, Jump squats, Push-up to T-position
– Weight selection: Use 60-70% of your normal vest weight for explosive movements
Start with just 4 rounds during your first session, adding 2 rounds weekly until you complete all 8. The vest transforms these already-intense movements into calorie-burning powerhouses that elevate metabolism for up to 72 hours post-workout. Avoid the critical mistake of using too much weight—your form must remain perfect throughout all 8 rounds, even when fatigued.
Tracking Progress with Weight Vest Training Exercises
Strength Benchmarks That Actually Matter
Track these measurable progress indicators to ensure you’re on the right path:
– Push-ups: Max reps with specific vest weight (Beginner goal: 25+ reps with 10% bodyweight)
– Squats: Time to complete 100 bodyweight squats with vest (Beginner: Sub-3 minutes with 5% bodyweight)
– Rucking: 3-mile pace with 10% bodyweight (Beginner standard: <45 minutes)
Record your results weekly in a training log, noting vest weight, reps, and how the workout felt. When you hit the beginner benchmarks, increase vest weight by 2-3% body weight and reset your targets. This systematic approach prevents plateaus and ensures continuous progress without overwhelming your body’s adaptation capacity.
Weight vest training exercises deliver unmatched versatility for building functional strength, endurance, and metabolic conditioning. Start conservatively with 3-5% body weight, prioritize perfect form over added resistance, and track your progress systematically. The most successful users treat vest training as a long-term investment—not a quick fix—progressing gradually while listening to their body’s feedback signals. Ready to transform basic movements into serious training stimuli? Strap on that vest and experience how strategic resistance elevates every aspect of your fitness journey.


