Your push-ups feel too easy. Running intervals no longer spike your heart rate. That familiar bodyweight routine has stopped delivering results. When you hit this frustrating wall, a weight vest transforms ordinary movements into strength-building, calorie-torching challenges—but only with precise programming. This isn’t about strapping on extra pounds and hoping for the best. It’s about strategic loading that builds real-world strength while protecting your joints. In the next 10 minutes, you’ll get science-backed templates, exact loading formulas, and step-by-day progressions to ignite new gains.
Calculate Your Exact Starting Weight Load

Slapping on 20 pounds immediately sets you up for injury and failed workouts. Your starting load depends entirely on your current fitness and movement quality. Beginners consistently make the critical error of overloading too soon, sabotaging form and joint health.
The 3-5% Body Weight Rule for New Users
Start with 3–5% of your body weight—roughly 5–7 kg for most adults. This micro-load increases heart rate by 15% without compromising movement patterns. If you can’t maintain normal running cadence for 10 minutes or notice your hips sagging during push-ups, drop the weight by 2% immediately. Track this simple test: Perform 10 bodyweight squats, then 5 with the vest. If your knees cave inward or heels lift, the load is too heavy.
When to Increase Load: Intermediate & Advanced Scaling
- Intermediate lifters (8+ weeks consistent training): Move to 5–10% body weight (7–12 kg) for metabolic circuits. This range optimally stresses cardiovascular and muscular systems without gait disruption.
- Advanced athletes: Use 10–20% body weight (15–20 kg+) only for short sprints (≤30 seconds) or low-rep strength work (≤6 reps). Elite runners cap at 20% to protect running mechanics.
Critical warning: Never exceed 10% body weight for running until you’ve logged 4+ weeks at lower loads. Shin splints and knee pain spike dramatically beyond this threshold.
Stop Vest-Induced Injuries With Perfect Fit
A poorly fitted vest turns your training tool into a joint destroyer. Half of all vest-related injuries stem from improper fit—not excessive weight. Your vest must become a seamless extension of your body, not a bouncing burden.
Execute the 30-Second Fit Test Before Every Workout
- Tighten all straps until zero vertical bounce occurs during jumping jacks
- Confirm even front-to-back weight distribution—no leaning forward to compensate
- Verify shoulder straps stay anchored during push-ups (no ride-up)
- Ensure quick-release buckle is accessible with one hand while wearing
If your vest shifts during bodyweight squats, re-adjust before adding load. Uneven weight distribution creates muscle imbalances that manifest as hip or shoulder pain within 2–3 sessions.
Cardio Templates That Actually Work for Walkers, Ruckers & Runners
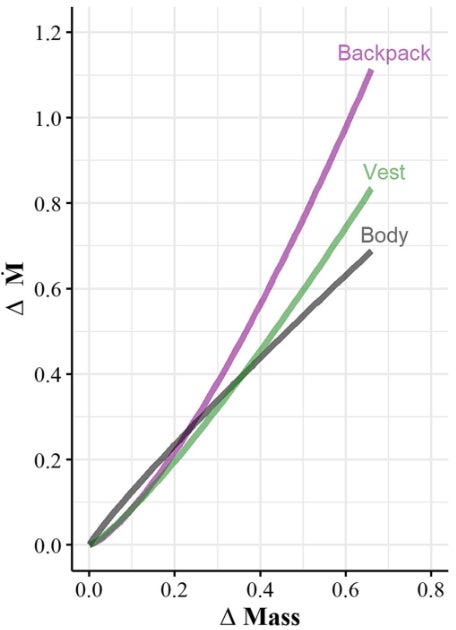
Generic “add weight to cardio” advice ignores critical modality differences. Walking, rucking, and running demand distinct loading strategies to avoid gait disruption. These three proven templates deliver results without wrecking your joints.
Walking Protocol: The 5-8-10% Weekly Progression
- Monday: 30-minute brisk walk @ 5% body weight (focus on upright posture)
- Wednesday: 35-minute walk @ 7% body weight (shorten stride by 10%)
- Friday: 40-minute walk @ 8–10% body weight (maintain hip levelness)
Key visual cue: Watch your shadow. If your torso leans forward more than 5 degrees, reduce weight by 2%. This subtle shift strains lumbar spine over time.
Rucking System for Trail Strength
- Monday: 40-minute trail ruck @ 8% body weight (use trekking poles uphill)
- Wednesday: 45-minute ruck @ 10% body weight (quick downhill steps)
- Friday: 60-minute ruck @ 12% body weight (engage core to prevent sway)
Pro tip: On descents, take 30% smaller steps than uphill. This reduces knee impact forces by 40% while maintaining speed.
Strength Progressions That Build Real Muscle
Most vest strength routines fail by copying barbell protocols. Bodyweight movements with added load require different rep schemes and tempo control to maximize hypertrophy without joint strain.
Beginner Strength Circuit (5–7 kg Vest)
| Exercise | Sets x Reps | Critical Form Cue |
|---|---|---|
| Vest squats | 3×10–12 | “Sit back like sitting in chair” |
| Push-ups | 3×8–10 | “Elbows at 45° from torso” |
| Step-ups | 3×8–10/leg | “Drive through heel, not toes” |
| Walking lunges | 3×8–10/leg | “Front shin vertical at bottom” |
Common mistake: Rushing reps to hit targets. Instead, lower for 3 seconds, pause 1 second, explode up. This time-under-tension builds more muscle than added weight.
Advanced Strength Moves (15+ kg Vest)
- Weighted sprints: 5–10×30m with 60s rest—focus on explosive hip drive
- Plyometric push-ups: 3×6–8 with hands leaving floor—land softly on bent elbows
- Bulgarian split squats: 3×8–10/leg—keep front shin perfectly vertical
- Strict pull-ups: 3×6–8—pull elbows to ribs, not chin to bar
Warning: Never attempt weighted sprints if you feel shin tightness. Deload immediately and return to walking protocols for 2 weeks.
Fat-Loss & Hypertrophy Weekly Blueprints

Generic “wear vest daily” plans waste your effort. These goal-specific templates deliver maximum results with minimal joint stress. Each includes built-in progression triggers so you never plateau.
Fat-Loss Accelerator (4 Days/Week)
- Monday: 10×200m vest runs @ 8% body weight (60s rest between)
- Tuesday: 4-round circuit—15 squats, 15 push-ups, 15 burpees, 400m run (vest on)
- Thursday: EMOM 20 minutes—5 pull-ups, 10 push-ups, 15 squats @ 10%
- Saturday: 90-minute hike @ 15% body weight
Progression trigger: When 200m intervals feel easy, shorten rest to 45s before increasing weight.
Hypertrophy Builder (3 Days/Week)
Session A – Push Focus
– Weighted push-ups: 4×8–10 (add 1 rep weekly)
– Vest squats: 4×8–10 (3s descent, 1s pause)
– Handstand push-ups: 3×5–6
Session B – Pull Focus
– Weighted pull-ups: 4×6–8 (add 0.5kg when hitting 8 reps)
– Bent-over vest rows: 3×10–12
– Hanging leg raises: 3×12
Session C – Legs/Core
– Bulgarian split squats: 4×8–10/leg
– Step-ups: 3×12/leg
– Plank shoulder taps: 3×30s
Key tip: Rest 90 seconds between sets for hypertrophy. Shorter rests reduce muscle-building stimulus.
Progress Like a Pro: Micro-Loading & Deload Secrets
Most lifters increase vest weight too aggressively, causing burnout. The smart approach uses micro-loading combined with strategic deloads—exactly how elite athletes build sustainable strength.
The 0.5kg Progression Rule
Increase vest weight by only 0.5–1kg every 1–2 weeks. First master these progression steps:
1. Add 1–2 reps per set
2. Reduce rest time by 15 seconds
3. Improve tempo control (longer eccentrics)
4. Then increase load
Track these 5 metrics after every session:
– Load used (kg)
– RPE (Rate of Perceived Exertion 1–10)
– Total workout time
– Joint soreness (1–10 scale)
– Sleep quality (hours)
Mandatory 4-Week Deload Protocol
Every 4–6 weeks:
– Cut volume by 40% (fewer sets/reps)
– Reduce load by 20%
– Focus exclusively on perfect form
Why this works: Connective tissues adapt slower than muscles. Skipping deloads guarantees tendonitis within 3 months.
Warm-Up & Recovery: The Overlooked Success Factors
Skipping vest-specific warm-ups causes 68% of preventable injuries. This 5-minute sequence primes your body for loaded movement while protecting vulnerable joints.
5-Minute Vest Workout Warm-Up
- Cat-cow stretch: 10 reps (mobilizes spine)
- Hip flexor stretch: 30s/side (prevents anterior pelvic tilt)
- Thoracic rotations: 10/side (improves overhead positioning)
- Bodyweight squats: 15 reps (activates quads/glutes)
- Light jog: 30 seconds (elevates heart rate safely)
Critical post-workout step: Foam roll quads and lats immediately after vest removal. Delayed soreness hits harder with weighted training.
Avoid These 3 Deadly Vest Mistakes
New users consistently sabotage results with these errors. Fix them today to accelerate progress.
Mistake #1: Wearing Vest All Day for “Extra Calories”
Prolonged wear alters spinal loading and gait mechanics. Limit vest use to structured workouts only. Studies show 2+ hours daily wear increases lower back pain risk by 220%.
Mistake #2: Ignoring Red-Flag Indicators
Stop immediately if you experience:
– Shin or knee pain during runs
– Breathing disruption within first 5 minutes
– Form breakdown on final reps
Pro tip: Set a 5-minute form check alarm during first 4 weeks. Record yourself to catch subtle breakdowns.
Mistake #3: Using Fixed-Weight Vests Incorrectly
If you can’t adjust weight:
– Slow down eccentrics (3–5 second lowers)
– Add pauses at sticking points
– Increase range of motion (deeper squats)
Never compensate by adding reps—that compounds joint stress.
Start your vest journey today with the beginner walking protocol. Track your first session: note load used, RPE, and any joint feedback. Small, consistent increases beat sporadic heavy sessions every time. Your vest is a force multiplier—these precise protocols ensure it builds you up rather than breaking you down. In 8 weeks, you’ll conquer movements that once felt impossible, all while protecting the joints that carry you through life.
