
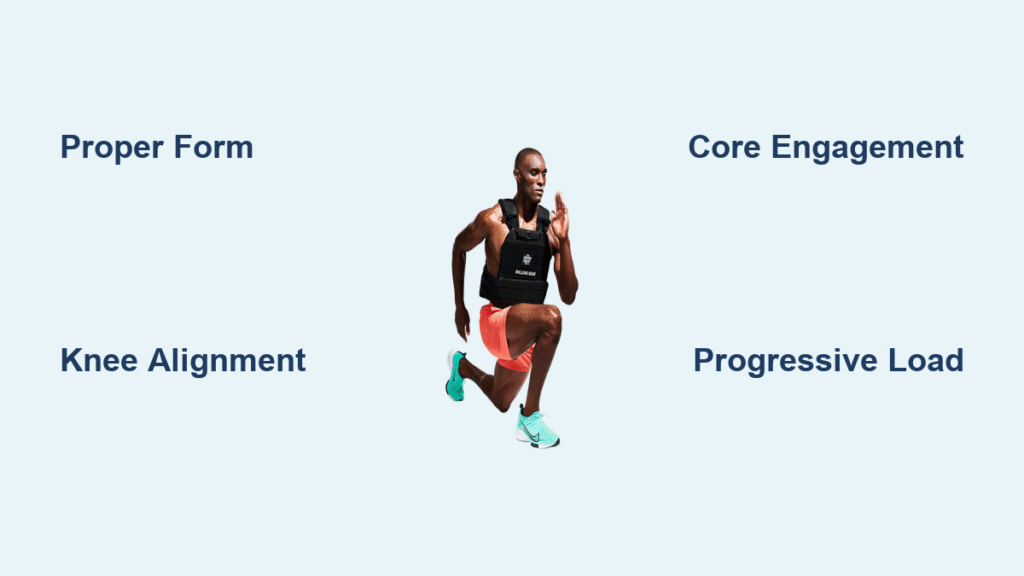
You’ve hit a plateau with bodyweight lunges and struggle to maintain proper posture with dumbbells. Weighted vest lunges deliver the perfect solution—adding significant resistance while keeping your center of gravity naturally aligned. This single exercise transforms basic lunges into a full-body powerhouse that builds leg strength, torches calories, and improves athletic performance simultaneously. Whether you’re training for CrossFit competitions or simply want more effective leg days, mastering weighted vest lunges will revolutionize your lower-body training.
Unlike traditional loading methods, weighted vest lunges distribute resistance evenly across your torso. This creates a vertical loading pattern that keeps your center of gravity exactly where nature intended—making the movement feel remarkably natural while dramatically increasing difficulty. Most athletes report that 20 pounds in a vest feels significantly harder than 40 pounds of dumbbells due to the constant, unrelenting load that engages your entire kinetic chain.
Why Weighted Vest Lunges Outperform Dumbbell Variations
The vest’s magic lies in its ability to load the movement without shifting your balance forward. This means your core works overtime to maintain posture while your legs handle pure vertical resistance. Without the forward pull of dumbbells, you eliminate common compensation patterns that lead to shoulder strain and compromised form. The even weight distribution allows you to focus entirely on lower-body mechanics and hip engagement rather than fighting to keep implements balanced.
Critical difference: Traditional dumbbell lunges create horizontal resistance vectors that pull your center of gravity forward, while weighted vest lunges maintain vertical loading. This subtle distinction preserves natural movement patterns and reduces joint stress—particularly in the knees and lower back.
Weighted Vest Lunge Muscle Activation Uncovered
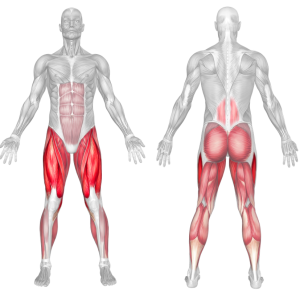
Quadriceps & Glutes: Your Primary Power Sources
Your quadriceps take the brunt during forward lunges, especially as you drive back to standing. The hamstrings fire hardest during reverse lunges or when using longer strides that create greater hip flexion. Your glutes—particularly the maximus—activate powerfully during the ascent phase, while the medius and minimus work overtime to prevent knee valgus collapse. The weighted vest increases time-under-tension on these critical muscle groups without altering their natural firing patterns.
Core Stabilizers: The Hidden Benefit
The transverse abdominis creates a rigid cylinder around your spine, preventing the weighted vest from pulling you into extension. Your erector spinae and multifidus work isometrically to maintain spinal alignment under load. Meanwhile, scapular stabilizers keep your shoulders from rounding forward—a common compensation when the vest gets heavy. This full-body engagement transforms weighted vest lunges from a leg exercise into a complete core stability challenge.
Flawless Weighted Vest Lunge Technique Checklist
Pre-Lunge Setup Essentials
Start with a snug vest that won’t bounce or shift during movement. Secure all weight plates facing inward to prevent clanking. Choose stable footwear—CrossFit shoes or minimalist trainers work best. Find non-slip flooring; carpet or rubber gym flooring prevents dangerous sliding. Ensure your vest sits centered on your torso with no upward tilt that could pull you forward.
Step-by-Step Execution for Maximum Results
Stand tall with feet hip-width apart, core braced like someone’s about to punch your stomach. Take a controlled step forward approximately 1.5 times your hip width—long enough that both knees reach 90 degrees at the bottom. Your front shin should remain vertical, with the knee stacked directly above the ankle.
Lower until your back knee hovers 1-2 inches above the ground. Keep your hips squared forward—imagine headlights on your hip bones that must stay parallel. Drive through your front heel, extending both knee and hip simultaneously. Exhale forcefully as you push back to start. Repeat for your desired reps, maintaining strict form throughout.
8 Weighted Vest Lunge Variations for Every Fitness Level

Foundational Patterns for Beginners
Forward Weighted Vest Lunge serves as your baseline—master this before progressing. Use 20-45 pounds and focus on strict form rather than load. Reverse Lunge reduces anterior knee shear, making it ideal for beginners or those with knee sensitivity. Walking Lunge transforms the movement into metabolic conditioning—start with 14-20 pounds for 50-foot distances, building to 400-meter challenges.
Advanced Progressions for Seasoned Athletes
Side Lunge targets adductors and glute medius—keep your trailing leg straight as you sit back into the movement. Jump Lunge develops power but requires caution—limit vest weight to 14 pounds maximum to protect joints. Tempo Lunge uses a 3-1-1 cadence (three-second descent, one-second pause, one-second drive) for maximum hypertrophy. Deficit Lunge places your front foot on a 4-6 inch platform, increasing range of motion and hip flexor stretch.
Program Weighted Vest Lunges for Your Specific Goals

Hypertrophy Protocol: Build Bigger Legs
Train weighted vest lunges twice weekly on lower body days. Perform 3-4 sets of 8-12 reps per leg with 60-90 seconds rest. Progress by adding 2-5 pounds every 1-2 weeks, or increasing reps within the range. This approach maximizes time-under-tension while allowing adequate recovery. The constant tension from the vest creates superior muscle fiber recruitment compared to traditional loading methods.
Strength & Power Focus: Lift Heavier, Move Faster
Once technique is solid, load up to 45 pounds (or 10% bodyweight) for strength gains. Use 4-5 sets of 4-6 reps with explosive concentric movement. Reverse and deficit variations work best here—forward lunges can create excessive knee stress under maximal loads. The weighted vest allows you to train strength without the balance challenges of heavy dumbbells.
Metabolic Conditioning: Burn Fat While Building Muscle
For CrossFit-style conditioning, use standard 20/14 pound vests as prescribed in classic WODs. “Will Lindsay” calls for 10 rounds of 22 alternating lunges with 55/35 pound dumbbells plus vest. “Summit Day” combines 300m runs, 50m walking lunges, and 50 box step-ups—all while wearing the vest. The continuous nature of walking weighted vest lunges elevates heart rate while maintaining strength benefits.
Critical Weighted Vest Lunge Mistakes to Avoid
Knee Valgus Collapse: The Silent Injury Risk
Watch for knees caving inward—this indicates weak glute medius and increases ACL risk. Cue “knee over pinky toe” and reduce weight if form breaks down. Strengthen hip abductors with clamshells and lateral band walks. Warning: Ignoring knee valgus with added vest weight significantly increases injury risk.
Forward Lean Compensation: Protect Your Spine
A heavy vest often causes torso pitching forward, increasing lumbar stress. Brace your core harder and imagine pulling your sternum upward. If you can’t maintain upright posture, reduce vest weight immediately. This compensation pattern defeats the primary benefit of vest loading—natural movement mechanics.
Short Stride Syndrome: Maximizing Glute Activation
Taking baby steps shifts load anteriorly, overstressing knees and underloading glutes. Lengthen your stride until front shin stays vertical at the bottom. Your back knee should nearly touch the ground with both knees at 90 degrees. Proper stride length ensures balanced muscle recruitment across quads, hamstrings, and glutes.
Choosing the Right Weighted Vest for Lunges
Start with adjustable plate-carrier styles from 5.11, Rogue, or Condor. These accommodate 2.5-45 pounds in precise increments. Standard CrossFit WODs use 20 pounds (male) and 14 pounds (female)—ensure your vest includes these specific weights. Quality vests range $60-200 depending on capacity and materials. Cordura construction withstands daily abuse, while Kevlar-reinforced options offer ultimate durability. Laser-cut steel plates reduce noise compared to cast iron—crucial for home training.
Your 4-Week Weighted Vest Lunge Progression Plan
Week 1: Master reverse lunges—3×10 each leg with 10 pounds. Focus on control and balance over load. Film yourself from the side to check shin angle.
Week 2: Progress to forward lunges—3×12 each leg maintaining 10 pounds. Increase volume before intensity. Add hip flexor stretches between sets.
Week 3: Introduce walking lunges—4×50 feet with 14 pounds. Mark distances with cones for consistency. Rest 90 seconds between efforts.
Week 4: Implement tempo work—4×8 reverse lunges using 3-1-1 timing with 14 pounds. This increases time-under-tension dramatically while reinforcing perfect technique.
Long-Term Weighted Vest Lunge Success Strategies
Master the movement unloaded before adding any weight—vest loading magnifies every dysfunction. Use walking or reverse variations to scale impact and knee stress based on your body’s needs. Track both volume and load meticulously; the vest increases systemic fatigue more than traditional implements. Pair weighted vest lunges with posterior-chain work like Romanian deadlifts and hip thrusts for balanced lower-body development.
Pro tip: Always prioritize movement quality over load—investing in perfect form now pays dividends when you’re crushing 400-meter walking lunge challenges later. The weighted vest lunge isn’t just another leg exercise—it’s a complete lower-body and conditioning solution that adapts to every fitness level. Start light, progress patiently, and watch your strength, stability, and work capacity skyrocket with consistent practice.


