
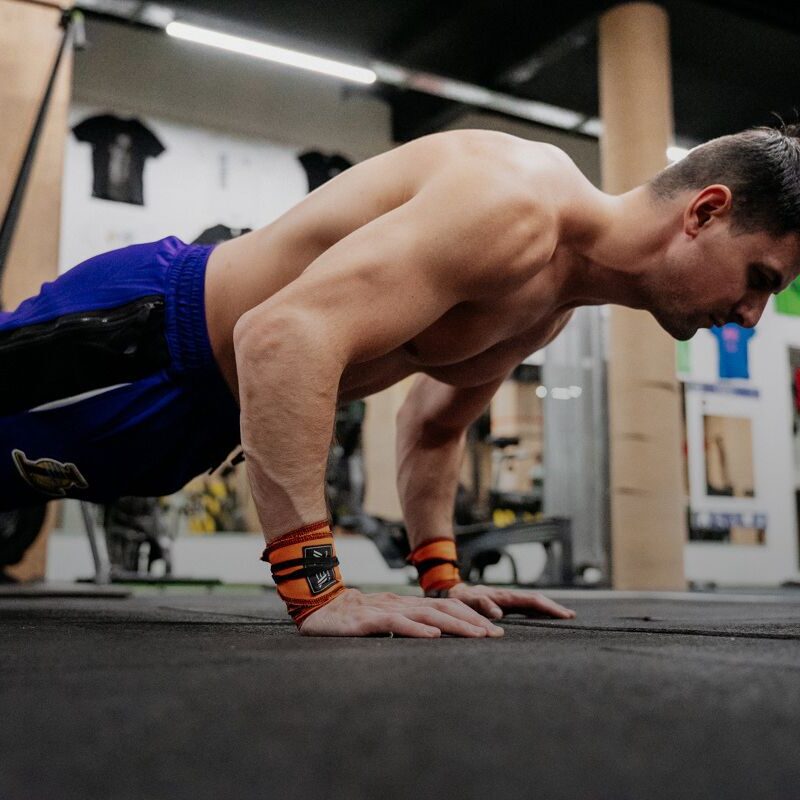
Your wrist collapses during push-ups, planks, or overhead presses—not from lack of effort, but because something’s fundamentally wrong. That buckling sensation or sharp pain when bearing weight is your body screaming for intervention. Ignoring it risks turning a temporary setback into chronic instability. Whether you’re a weekend warrior or yogi, understanding why your wrist fails under load is non-negotiable for safe training.
This isn’t about “toughing it out.” We’ll diagnose your specific failure point, implement pain-killing protocols within 24 hours, and rebuild load tolerance through proven rehabilitation phases. Stop compromising your workouts—your path to pain-free pressing starts now.
Why Your Wrist Fails Under Load During Push-Ups

Acute Structural Damage You Can’t Ignore
Distal radius fractures cause immediate buckling after falls (FOOSH mechanism). Even light pressure reproduces sharp pain near the thumb side with visible swelling. Scaphoid fractures hide in plain sight—tenderness in the anatomical snuff-box (thumb-side depression) worsens when making a fist. TFCC tears create ulnar-sided clicking during bench presses or planks, making wrist rotation unstable under load.
Weight-Lifting Technique Errors Crushing Your Wrist
Barbell placement mistakes are silent killers: resting weights on your distal palm (fingertips) instead of the meaty base of your hand creates dangerous hyperextension. Exceeding 70-degree extension during pressing movements torques ligaments beyond capacity. Skipping warm-ups leaves cold forearm muscles unable to absorb shock, transferring stress directly to vulnerable joints.
Hidden Inflammatory Triggers
Gout flares deliver sudden, fiery wrist pain with redness—uric acid crystals inflaming the joint space. Rheumatoid arthritis causes symmetric morning stiffness lasting >30 minutes, gradually eroding carpal bone integrity. Carpal tunnel syndrome manifests as thumb/index/middle finger numbness when holding plank position, signaling nerve compression under load.
Critical Self-Diagnosis Before You Move Another Weight
Red Flag Warning Signs Requiring ER Visit
Stop immediately if you notice:
– Visible deformity or “dinner fork” wrist contour after trauma
– Severe swelling within 30 minutes of injury
– Inability to gently push palm against wall
– Numbness in thumb/index/middle fingers (median nerve)
– Complete loss of finger motion
These indicate fractures or nerve damage needing X-rays within 24 hours.
30-Second Home Tests That Pinpoint Your Issue
Anatomical snuff-box test: Press thumb-side depression while making a fist. Sharp pain = scaphoid fracture risk.
Axial load test: Gently push palm against wall. Reproduced pain = structural compromise needing imaging.
Grip strength check: Squeeze stress ball with both hands. <80% strength on painful side = significant impairment.
Emergency Pain-Killing Protocol (First 72 Hours)
Immediate Damage Control Steps
Eliminate ALL loaded extension positions—even light yoga poses aggravate micro-tears. Ice rigorously: 15 minutes on/45 off using cloth-wrapped commercial packs (never direct skin contact). Elevate above heart level during rest to drain swelling. Apply topical diclofenac gel 3x daily for targeted inflammation reduction without gut irritation from oral NSAIDs.
Optimal Splinting for Fast Healing
Wear a neutral-position splint (0-20° extension) 24/7 except for hygiene. Custom splints from hand therapists outperform drugstore options for fractures or TFCC tears. Over-the-counter versions work for mild tendonitis but must allow thumb movement. Never skip nighttime splinting—unconscious wrist curling during sleep reverses daytime healing.
Phase-Based Rehabilitation That Restores Load Capacity
Phase 1: Pain Control (Weeks 0-2)
Start ONLY when acute pain subsides:
– Tendon glides: Cycle through hook fist → full fist → straight fist → flat hand (10 reps, 3x/day)
– Median nerve flossing: Alternate wrist extension/fingers extended → wrist flexion/fingers curled (15 reps)
– Pain-free circles: Trace quarter-sized circles clockwise/counter-clockwise (20 reps)
Progress ONLY when you achieve full passive range of motion without pain.
Phase 2: Strength Rebuilding (Weeks 2-4)
Isometrics before dynamic loading:
– Light resistance ball squeezes: Hold neutral wrist position for 10 seconds (3 sets of 15)
– Theraband radial deviation: Pull band toward thumb side against resistance (2×20)
– Rice bucket training: Submerge hand, practice rotating palm up/down while gripping rice
Critical benchmark: Reach 80% grip strength of unaffected side before Phase 3.
Phase 3: Functional Loading (Weeks 4-8)
Progressive closed-chain exercises:
1. Wall push-ups at 45° angle (palms flat, elbows bent 45°)
2. Incline push-ups on bench (gradually lower surface height weekly)
3. Push-up handles maintaining neutral wrist alignment
4. Full push-ups ONLY when pain-free at previous level
Form non-negotiables: Barbell rests across proximal palm (not fingertips), wrist stacked directly under shoulder, zero hyperextension.
Smart Exercise Swaps to Keep Training While Healing
Zero-Wrist-Strain Upper Body Alternatives
Replace push-ups with:
– Fist push-ups on knuckles (maintains neutral wrist)
– Dumbbell floor presses (elbows stay tucked, no wrist extension)
– Landmine presses (angled bar path enables neutral grip)
For overhead work: Use Swiss bar shoulder presses or seated machine presses eliminating stabilization demands.
Lower-Body Focus to Maintain Fitness
Build strength without wrist involvement:
– Back squats with safety bar (zero wrist extension)
– Hip thrusts and leg press (maximal glute/quad activation)
– Captain’s chair knee raises (core work sans hanging)
Cardio options: Running, cycling, or swimming with pull buoy between legs.
Equipment Hacks That Reduce Joint Stress Immediately
When to Use Wrist Wraps vs. Fat Grips
Wrist wraps ONLY for heavy sets (>80% 1RM)—overuse weakens natural stabilizers. Fat grip adapters reduce joint stress by 30% during pulling movements; start with 50% of normal weight for 2 weeks. Compression gloves provide proprioceptive feedback for arthritis sufferers during light activity.
The Push-Up Handle Game Changer
Vertical grip handles eliminate wrist extension torque. Place handles shoulder-width apart, keep elbows at 45°, and lower chest between hands. Progress from 3 sets of 8 reps to 3×15 before attempting floor push-ups.
Wrist Recovery Timeline Back to Full Training
| Week | Key Milestones | Safe Activities |
|---|---|---|
| 0-2 | Pain-free passive ROM | Lower body, core, cardio |
| 2-4 | 80% grip strength | Light cable rows, neutral grip presses |
| 4-8 | Full ROM, 90% strength | Incline push-ups, landmine presses |
| 8+ | Pain-free at prior loads | Resume heavy bench, planks, handstands |
Critical rule: Any sharp pain during loading = immediate stop. Revert to previous phase for 1 week.
Permanent Prevention System for Wrist Resilience
2-Minute Daily Maintenance Routine
- Forearm stretches: Extend arm, pull fingers back 30 seconds; reverse for flexors
- Wrist circles: 15 clockwise/counter-clockwise with light dumbbell
- Finger extensions: Rubber band pulls 30 seconds (prevents tendon imbalance)
Warning Signs That Signal Impending Relapse
Track weekly grip strength with a dynamometer—drops >10% mean you’re overreaching. Persistent morning stiffness >15 minutes indicates inflammation requiring deload. Schedule quarterly hand therapist screenings to catch asymmetries before they become injuries.
When to Demand Specialist Intervention
Seek immediate hand specialist care if:
– Pain persists >2 weeks despite load modification
– Grip strength falls below 70% of unaffected side
– Numbness develops during daily tasks
– Visible joint instability when gripping objects
Follow this specialist pathway: Sports medicine physician → certified hand therapist → orthopedic surgeon (only if imaging confirms surgical need).
Bottom line: Wrist load failure demands strategic load management—not grit. 90% of cases resolve within 8 weeks by respecting neutral wrist alignment and phased reloading. Your comeback starts today: eliminate aggravating positions, implement Phase 1 rehab immediately, and return stronger with smarter technique. Stop training through pain; start training your wrist to bear weight correctly.


